Custom Fields
What are Custom Fields?
Custom fields are a powerful feature in task management tools that allow users to tailor their workflows to meet specific needs. Unlike standard fields such as due dates, assignees, and priorities, custom fields enable you to create unique data points relevant to your projects. Whether you need to track budgets, add project stages, or monitor specific metrics, custom fields provide the flexibility to capture and organize information in a way that aligns with your team's processes. This customization enhances the efficiency of task management by ensuring that all critical details are visible and actionable within your workflow.
The main advantages of custom fields include:
Enhance project tracking and organization
Tailor the project management experience
Improve data tracking and reporting accuracy
Facilitate communication and collaboration
Enhance user experience
Enable customized workflows
Facilitate data-driven decisions
What are the Types of Custom Fields?
As the list of custom field types grows, we have collected all the information regarding each custom field here.
What is the Custom Task Fields Library?
To have a better overview of all the custom fields that you can use, we decided to organize them into libraries. Each workspace, project or organization has its own Task Fields Library. You can also have a library for all the custom fields that you have used for your personal tasks.
[!Note] If you are part of a project and its parent workspace, the custom fields will be saved in the Workspace Task Fields Library.
User permissions for Custom Fields Library
| Level | Description |
|---|---|
| Organization | Only owners of an organization can delete custom fields from the library. Users with contributor permissions can edit an already existing field or create a new one. |
| Workspace | Everyone, who is a contributor or an owner in a workspace can make changes in the library. This means that they can edit and delete fields, as well as create new fields. |
| Project | Everyone who is an owner in a project can make changes in the library. This means that they can edit and delete fields, as well as create new fields. |
How Do I Create a Custom Field?
To create a custom field, you need to:
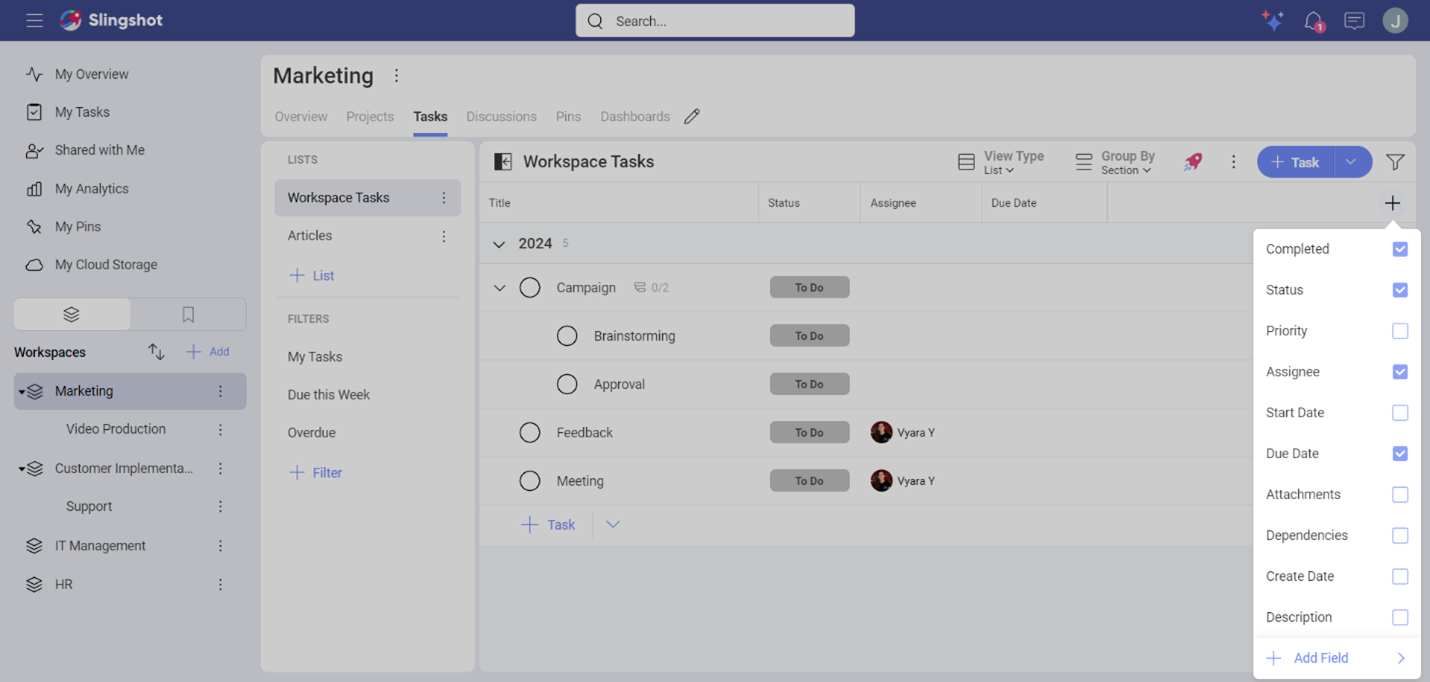
Click/tap on the + field button in the task list in the top right corner.
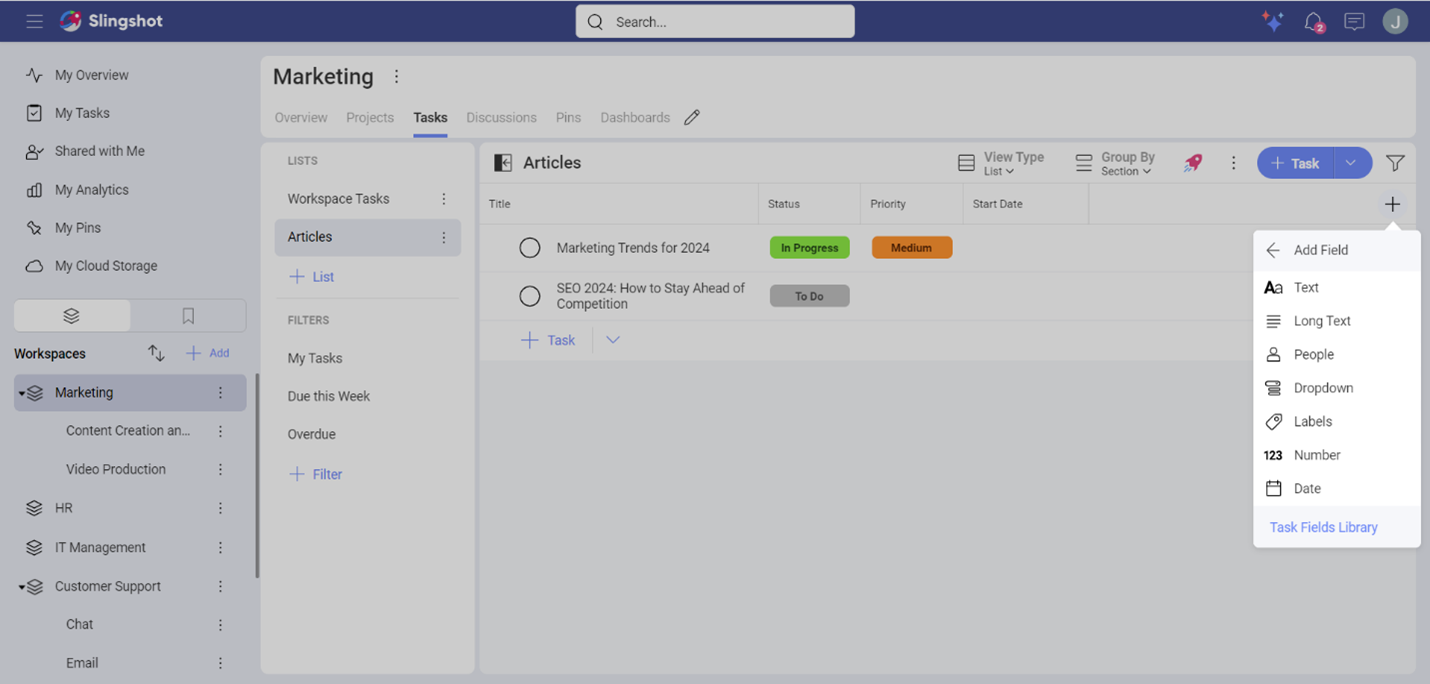
From the drop down that appears, you can toggle on/off existing fields or create new fields in the task list. To create a custom field, click/tap on +Add Field.
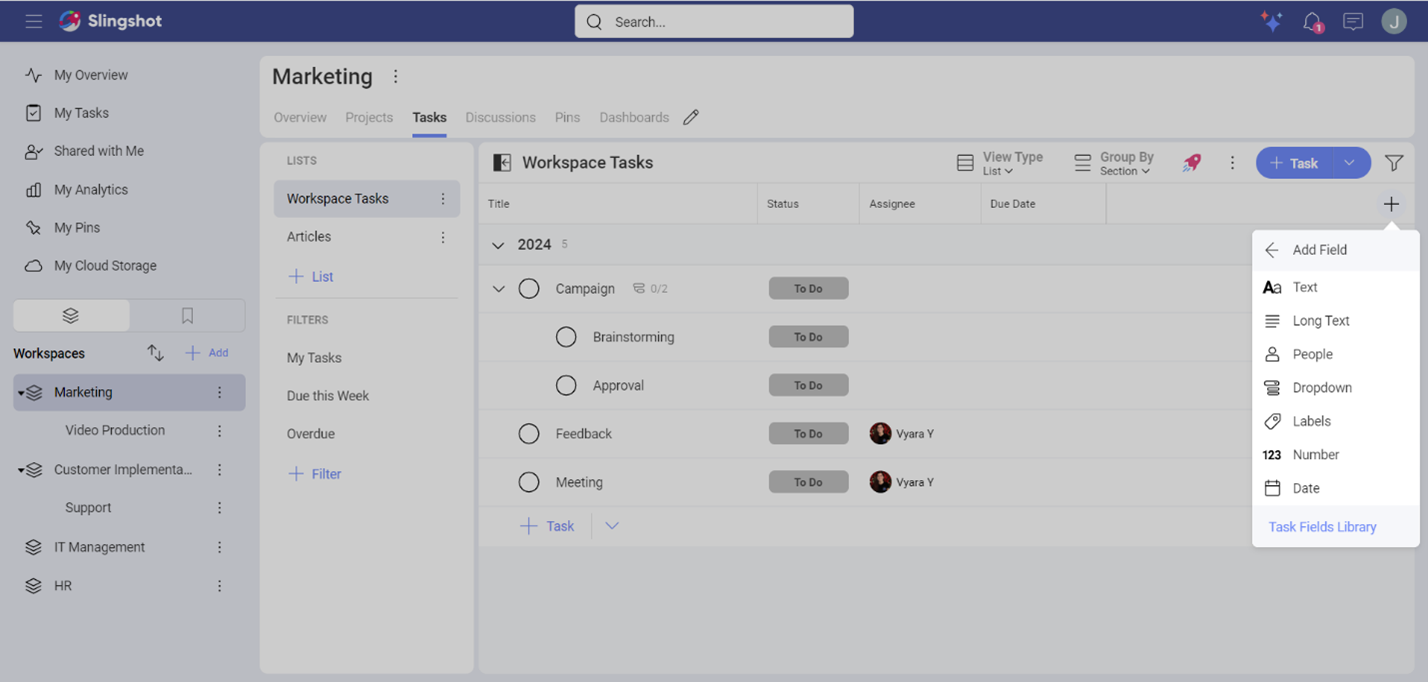
- From here you can pick the type of field that best fits your internal flows.
- Based on the field that you have chosen you will be presented with different options.
For example, we wanted to have a way to categorize our tasks in our Marketing workspace. This is why we chose the Labels field. Here we were able to set up different values for the field, such as Email and Social Media.
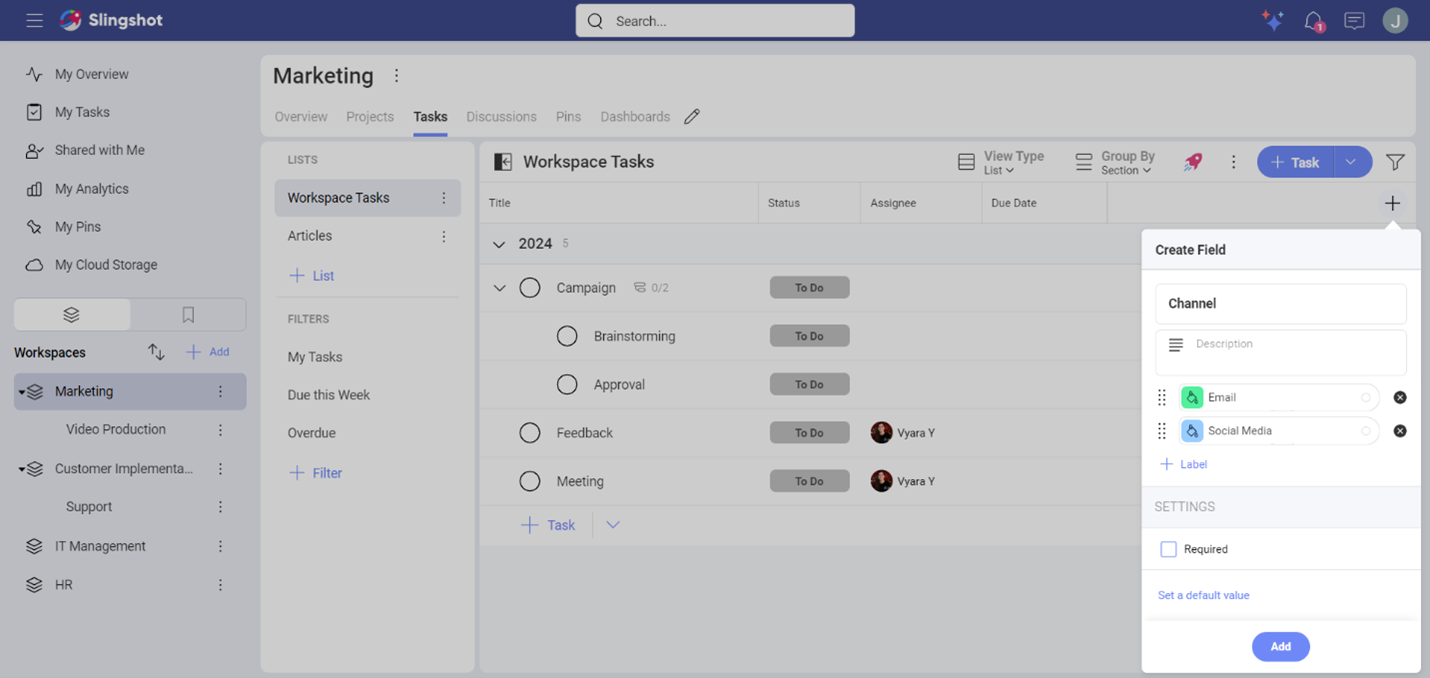
When you are ready with the changes, click/tap on Add.
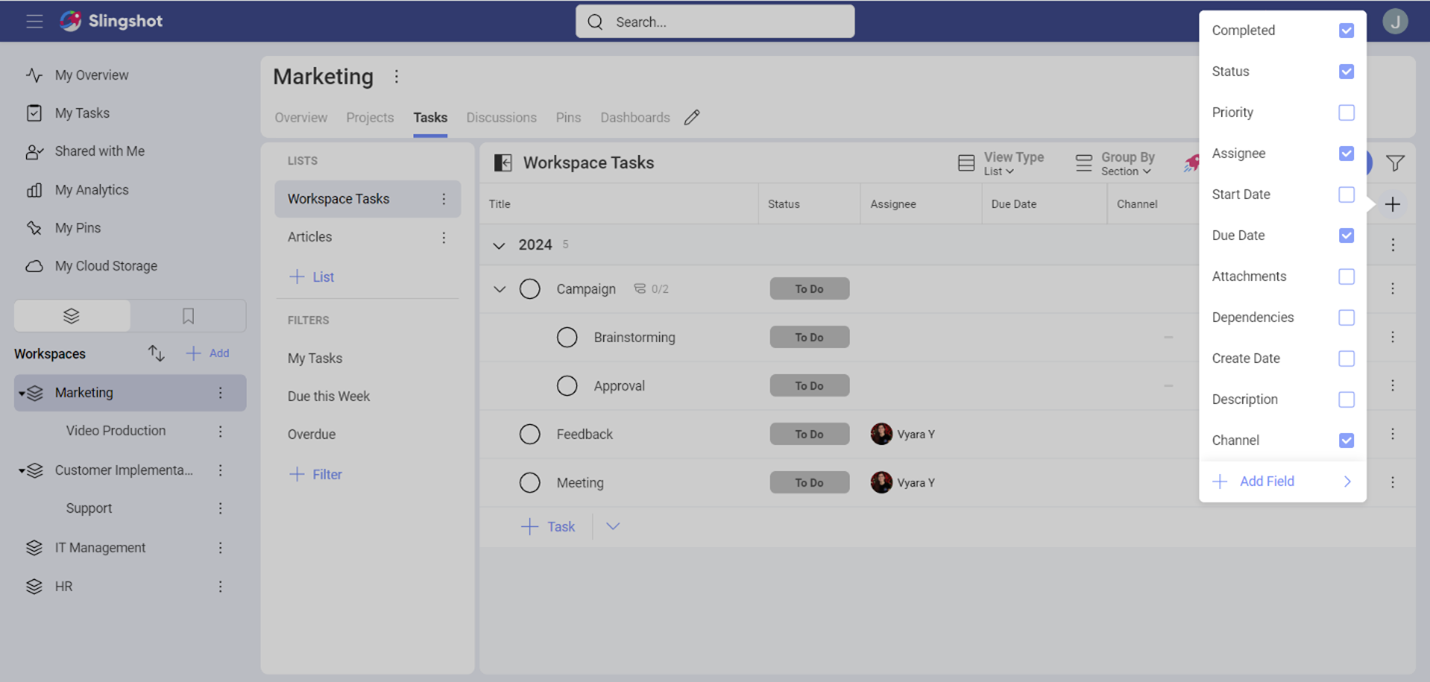
You can find the new field in the list of fields in your task list.
How Do I Edit an Existing Custom Field?
When you edit an existing custom field, the changes you make will affect all the tasks that are currently using that field.
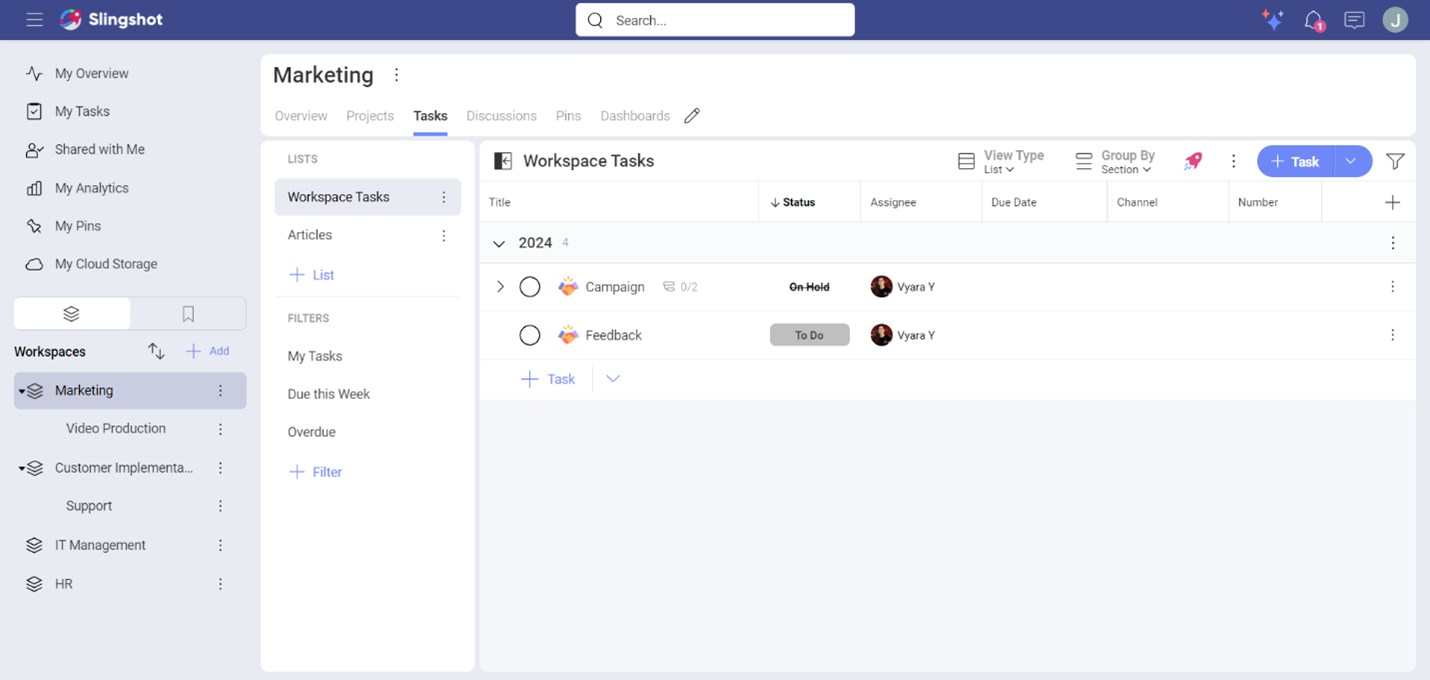
Any task with a removed value will have its value with the original name crossed out. This way team members can see what got removed directly from the task list.
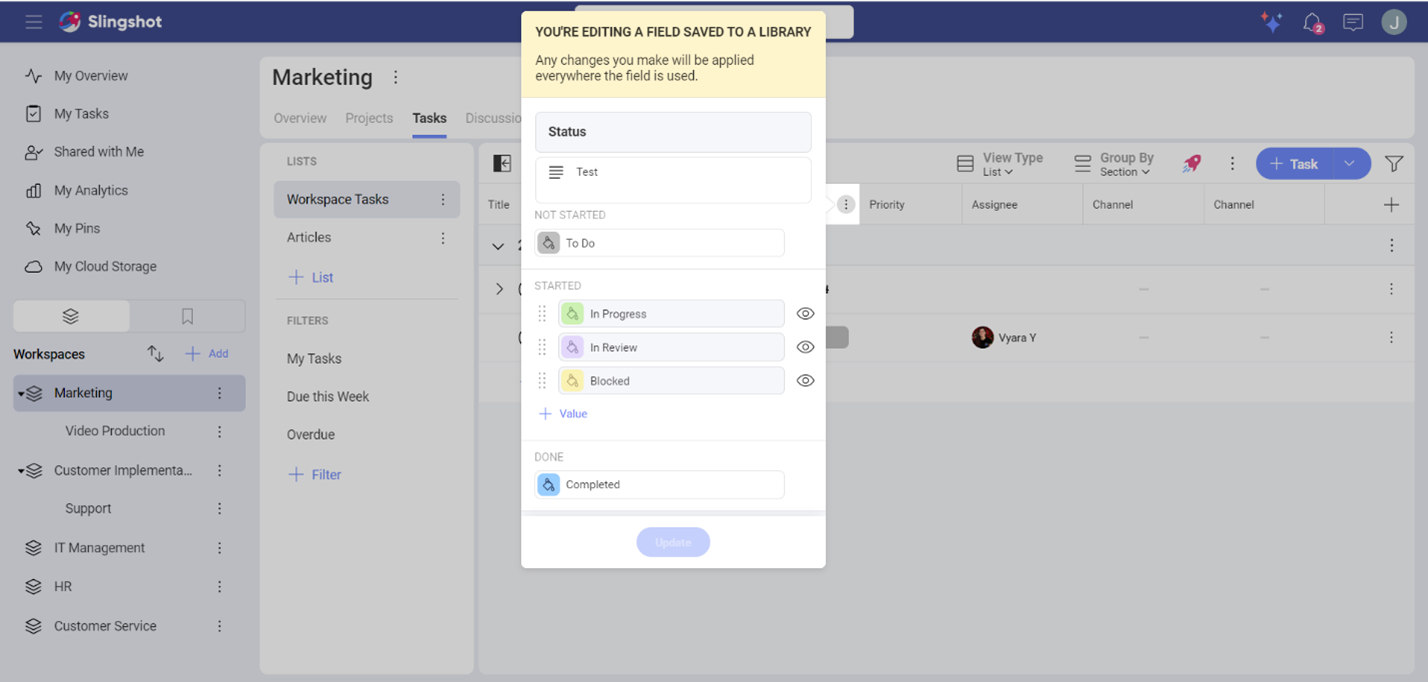
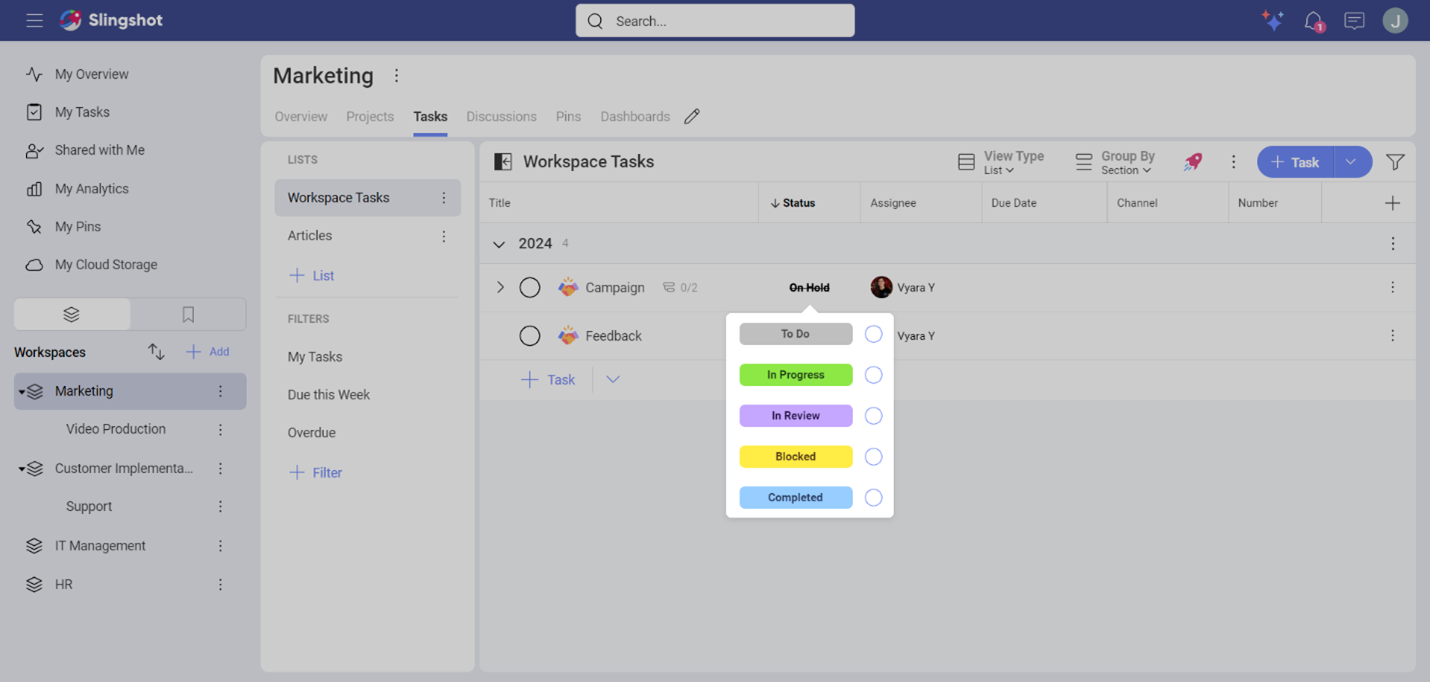
For example, our team used On Hold to show the status of the tasks. After some changes in our flows, we decided to use the default status value Blocked instead of On Hold.
This is why we:
- Removed the value On Hold from the status of the task type named Campaign Type. The value got crossed out.
- Made the value Blocked visible in the task type, so it can show up in the options for Status.
- Changed the status of a task directly from the task list.
How Do I Delete an Existing Custom Field?
To delete a custom field:
Open the overflow menu of that field you want to remove.
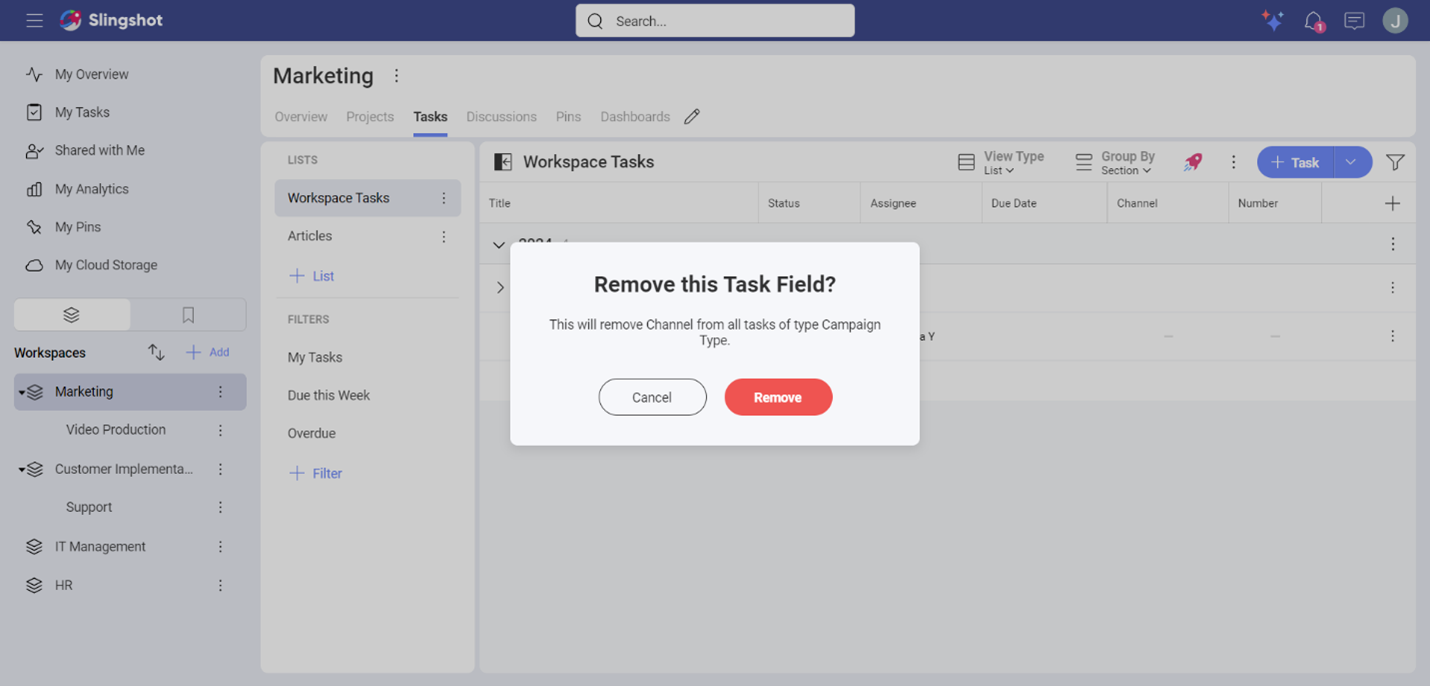
Click/tap on Remove Field. The field will be removed from any tasks and task types that it is currently used in. If you have added it to the Task Fields Library, the field will still be available for use.
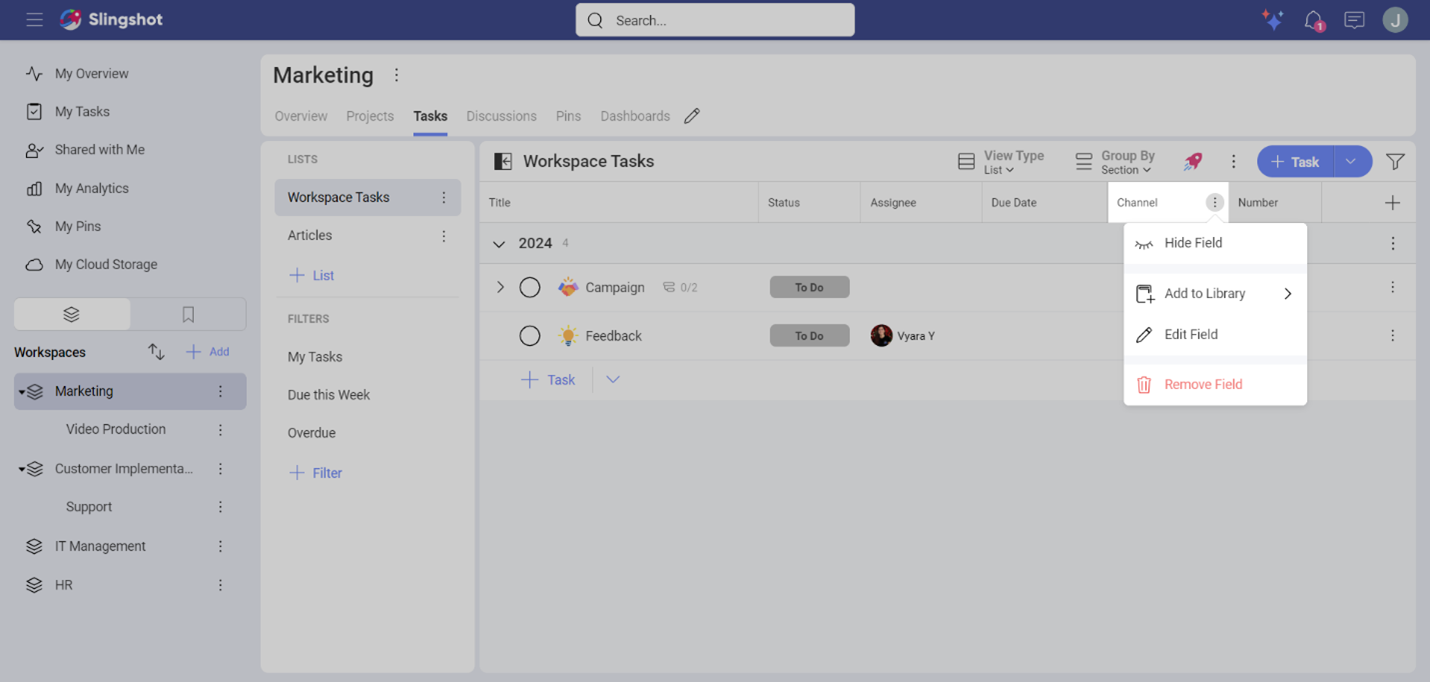
- As this action cannot be undone, you will get a warning (as shown below). To apply the changes, click/tap on Remove.
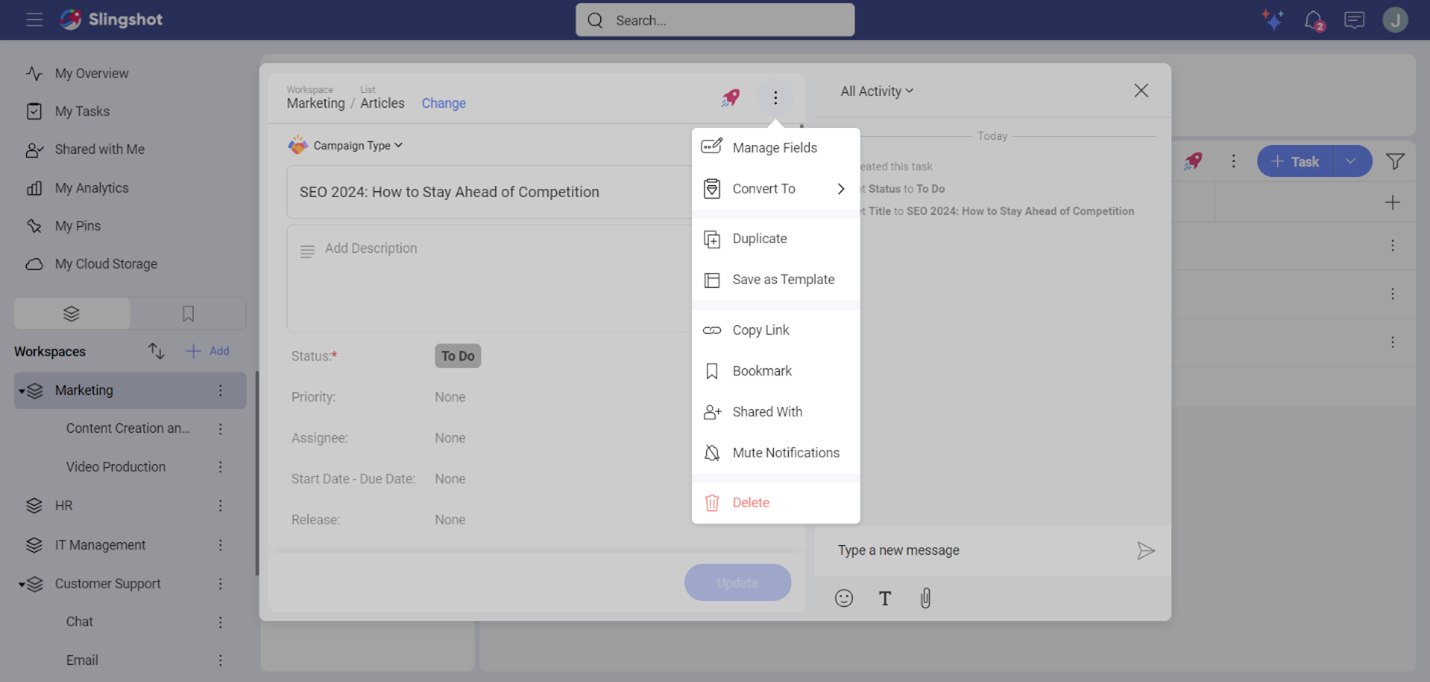
You can also remove a field directly from an opened task when you:
Open the overflow menu of the task.
Click/tap on Manage Fields.
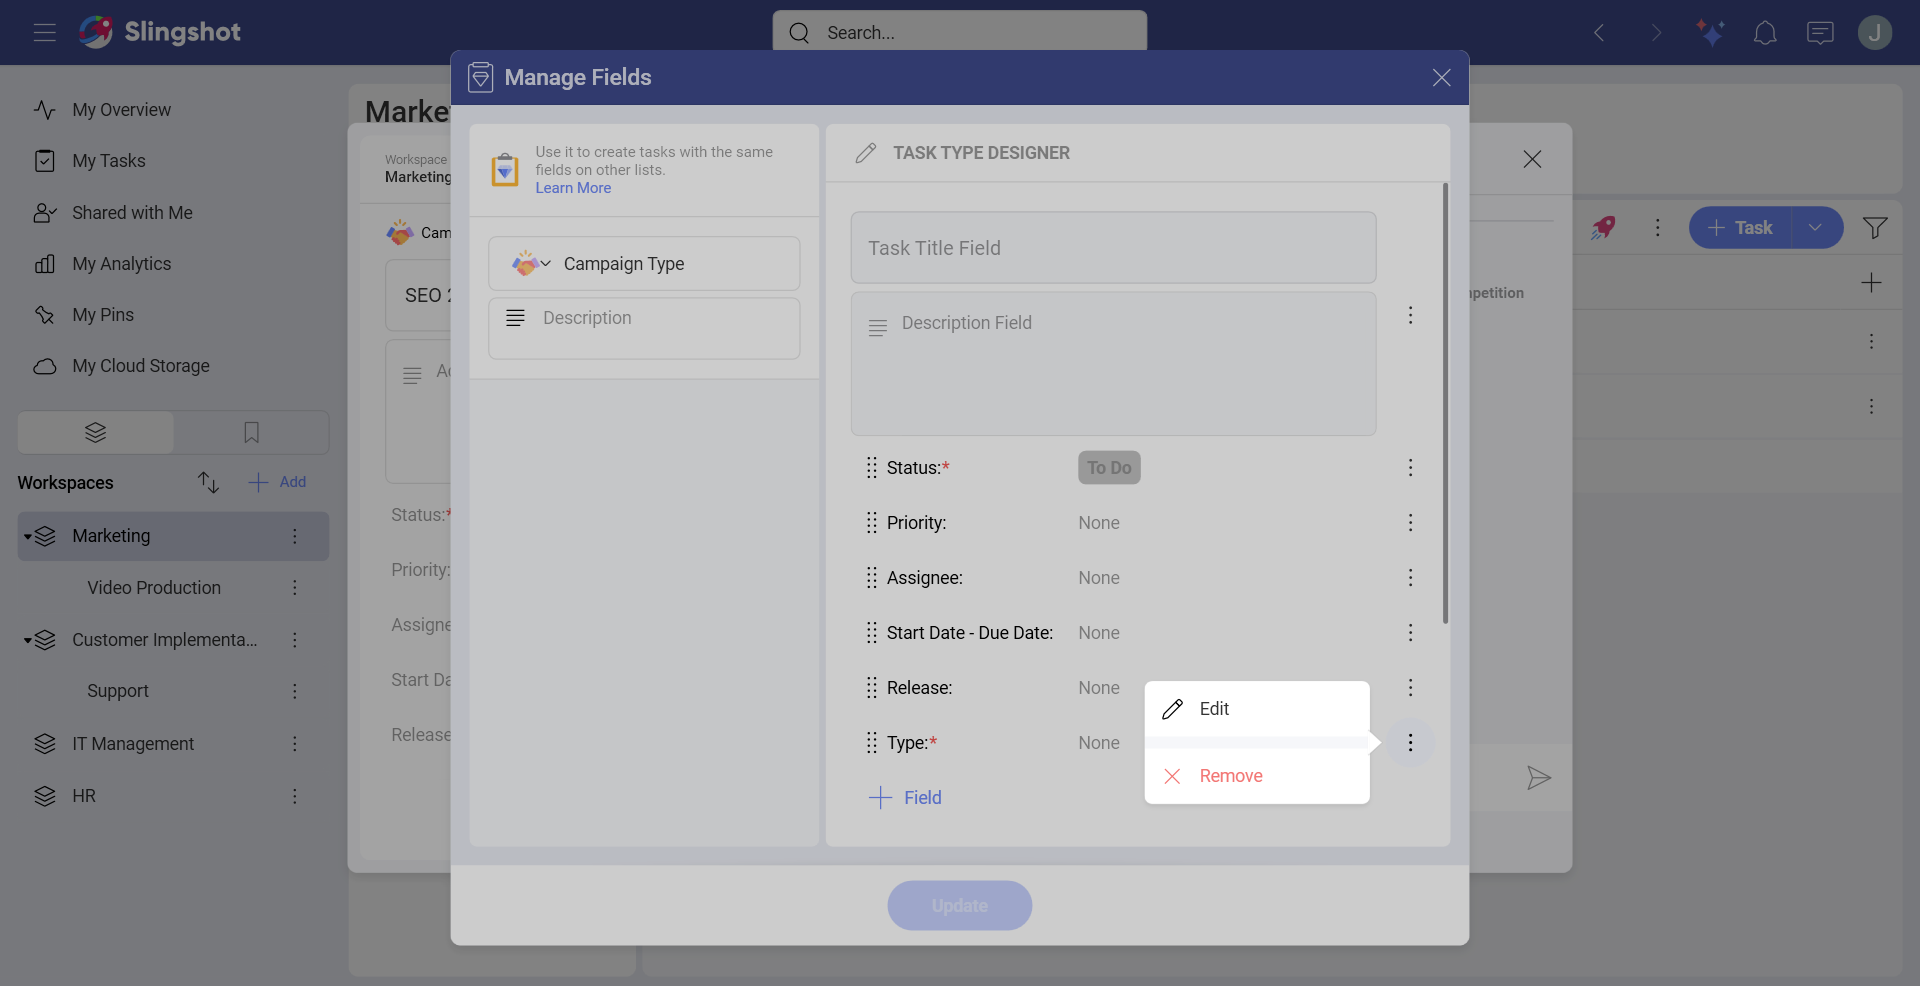
- You will be presented with the following dialog box where you can remove fields when you open the overflow menu of a field and click/tap on Remove.
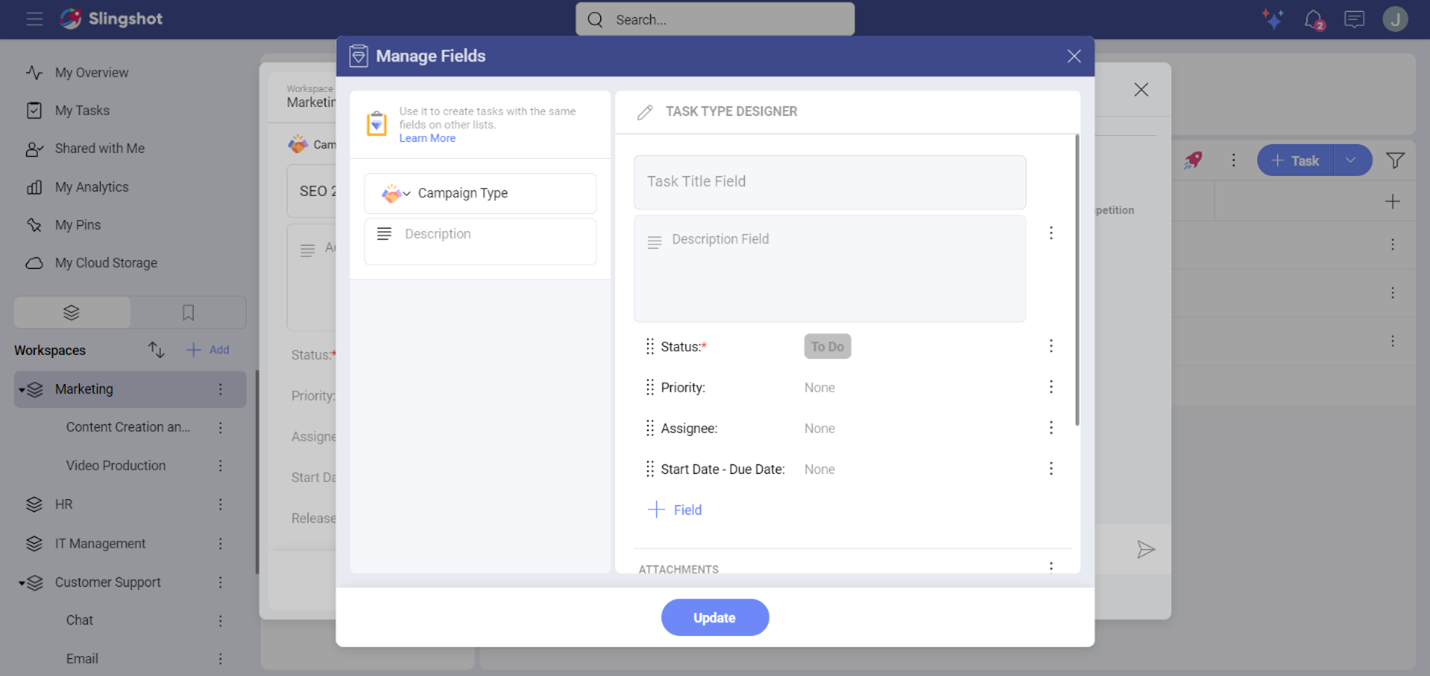
- When you are ready with the adjustments, click/tap on Update.
How Do I Use Custom Fields from the Task Fields Library?
When you collaborate with other users, often you will need to use specific custom fields to follow your company's policies and processes.
In every organization, workspace or a project, you can find custom fields, created by your team members. They will be stored in the Task Fields Library.
To use a custom field from a Task Fields Library, you need to:
Click/tap on the + field button in the upper right corner in a task list.
Choose + Add Field.
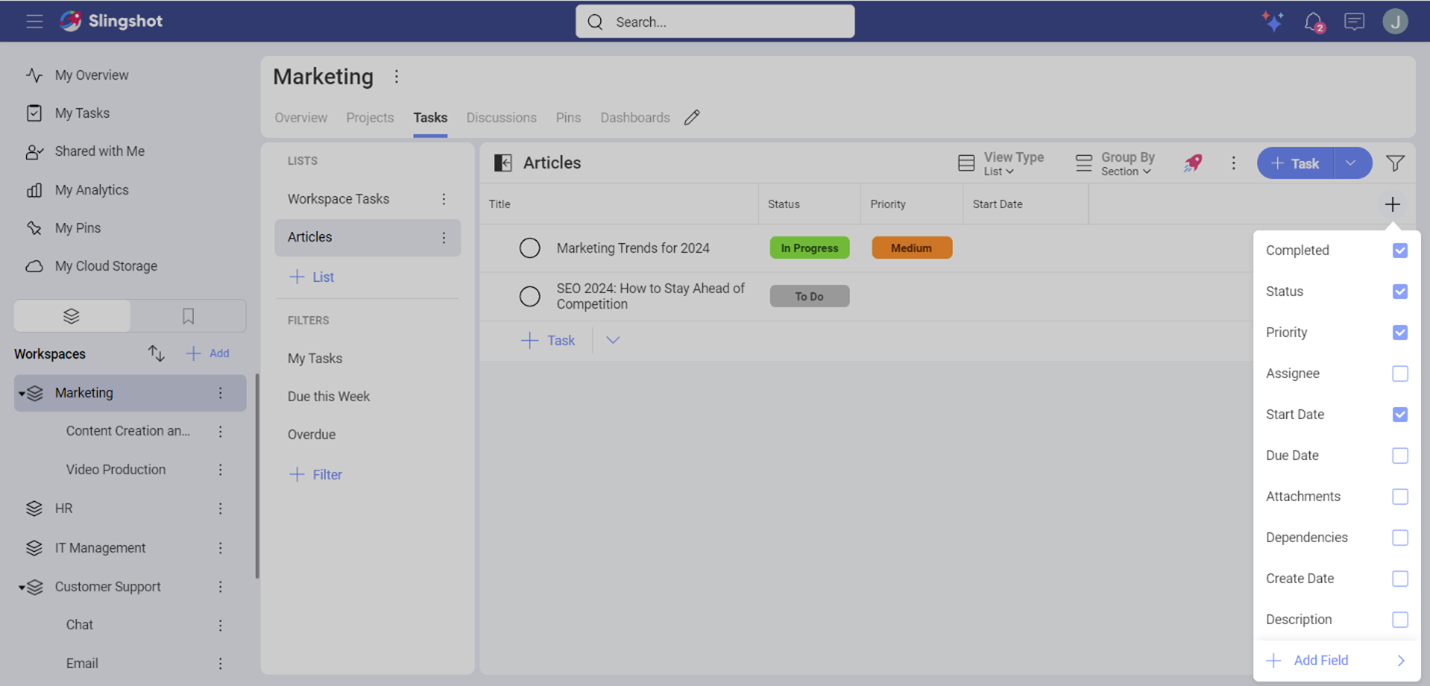
- Click/tap on Task Fields Library.
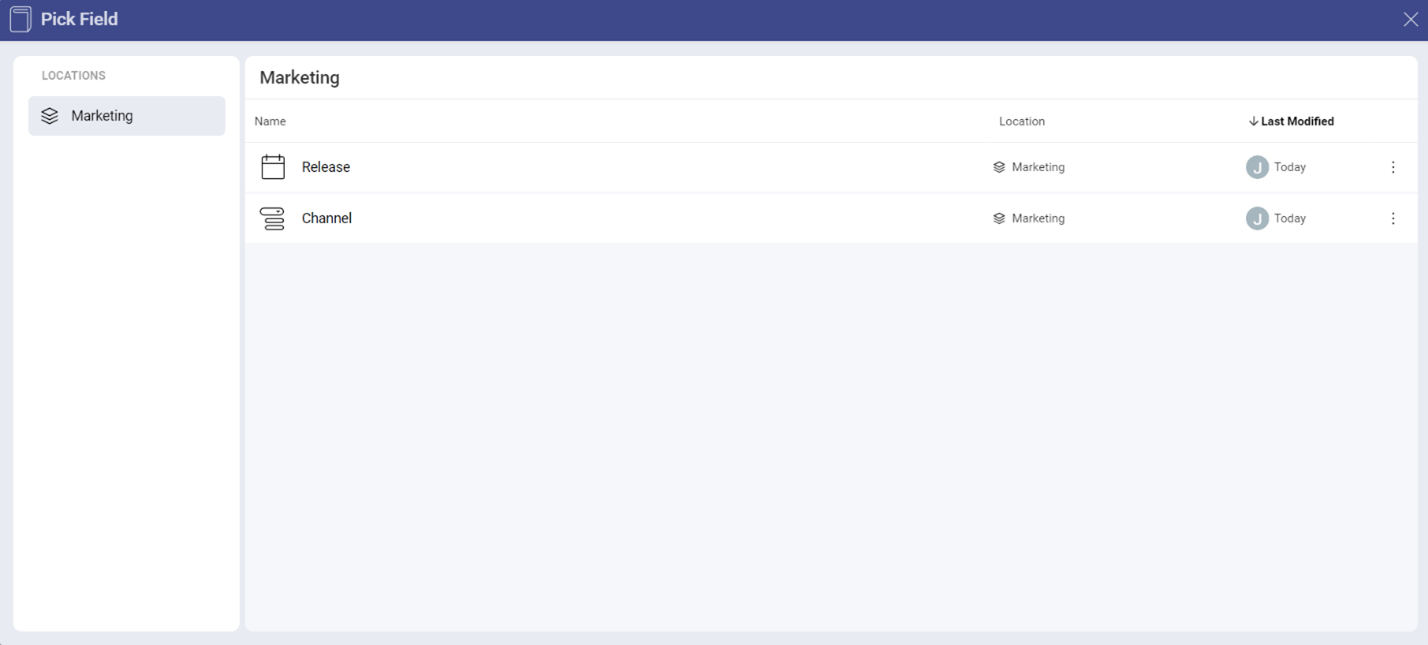
- You will see a list of custom fields saved in a specific location (workspace, project, or organization). Pick the one that best fits your goals.
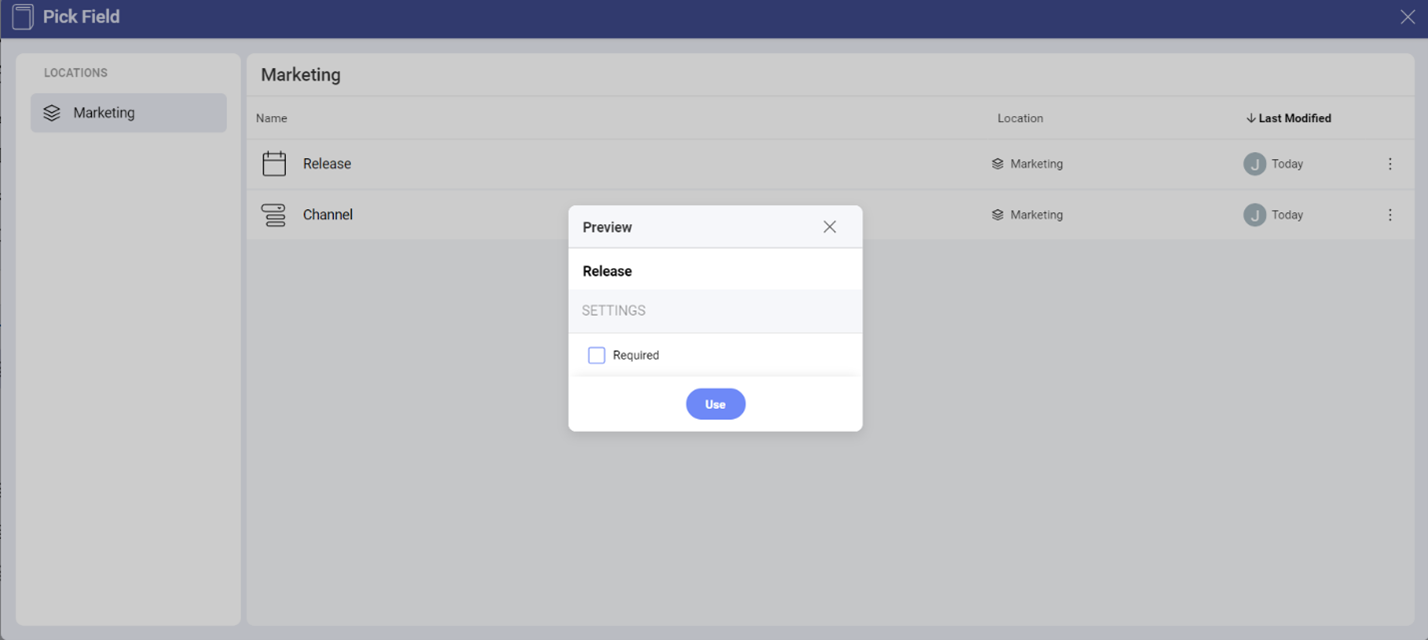
- Click/tap on Use.
- You will see the field in the task list.
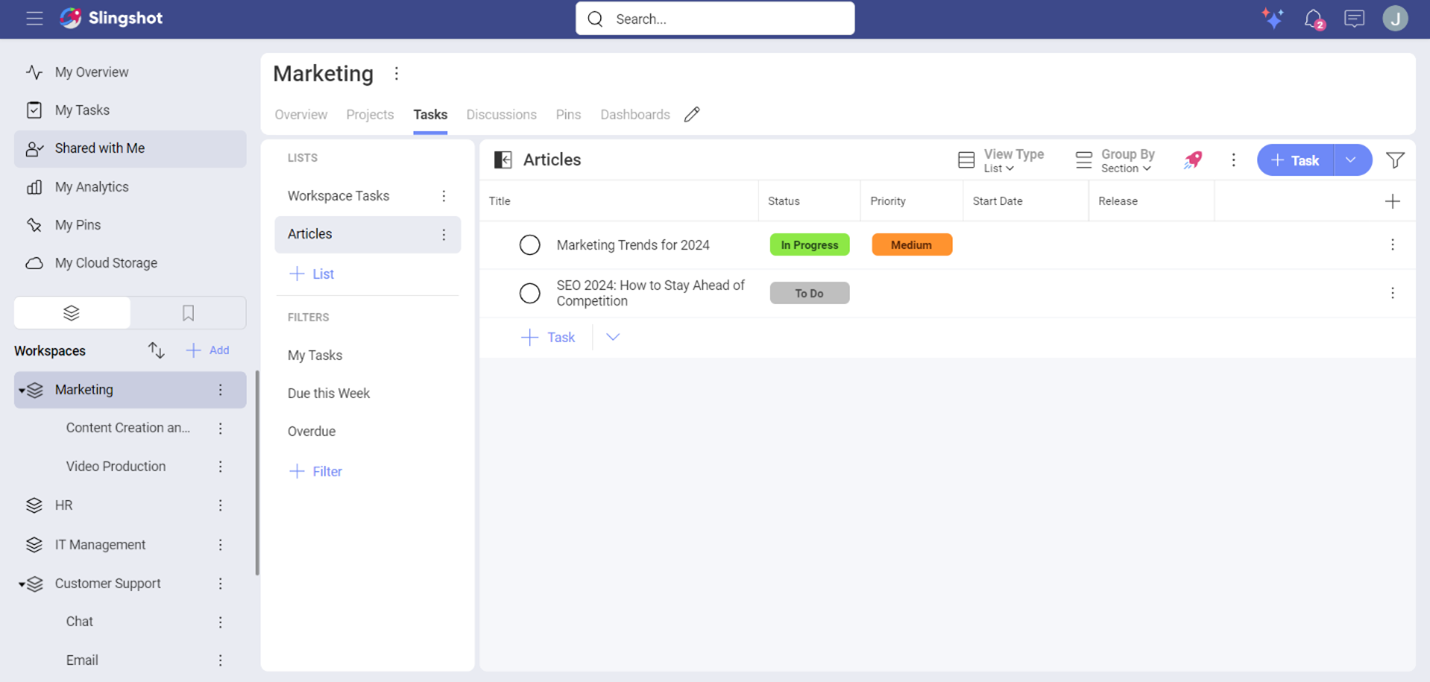
Applying Custom Fields to Subtasks
When you have a complex task, you can divide it into subtasks for better management of the responsibilities.
If you have opened a task list and want to add a custom field to subtasks of a task, you can:
Open the overflow menu of a subtask.
Choose Manage Fields.
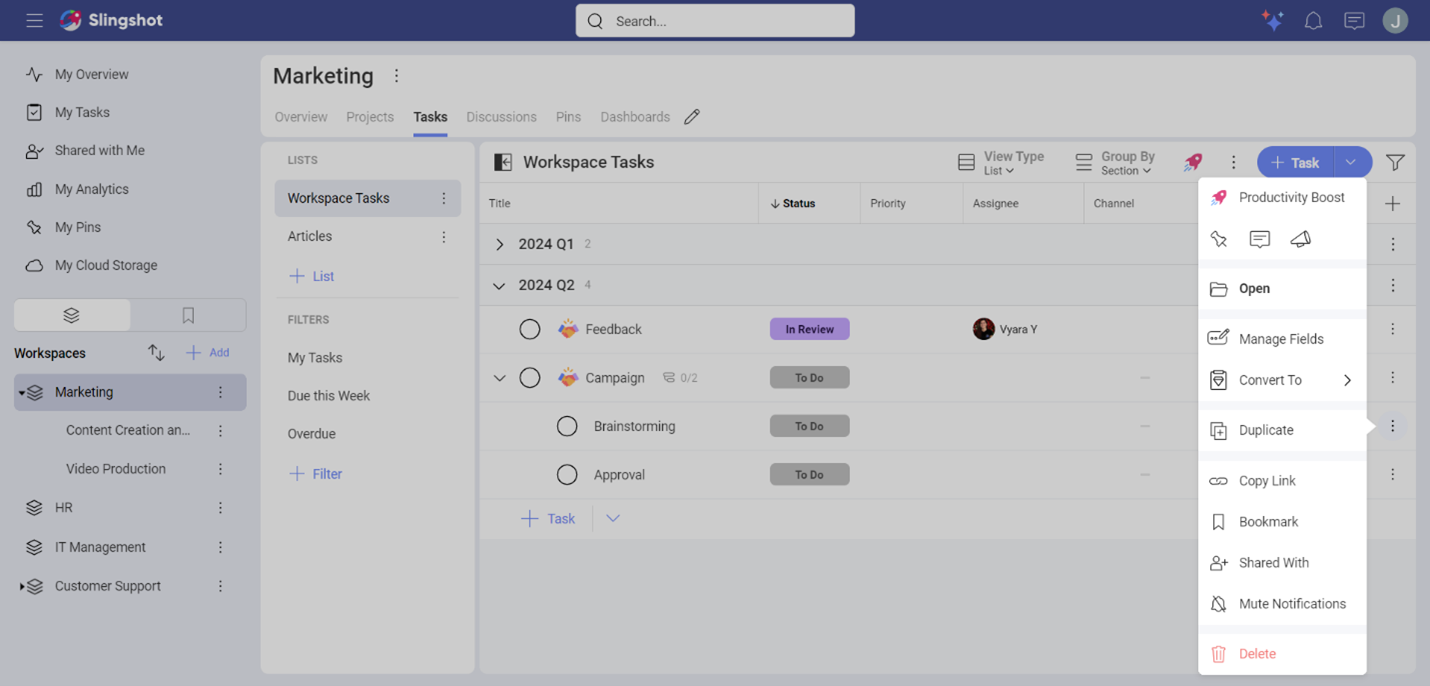
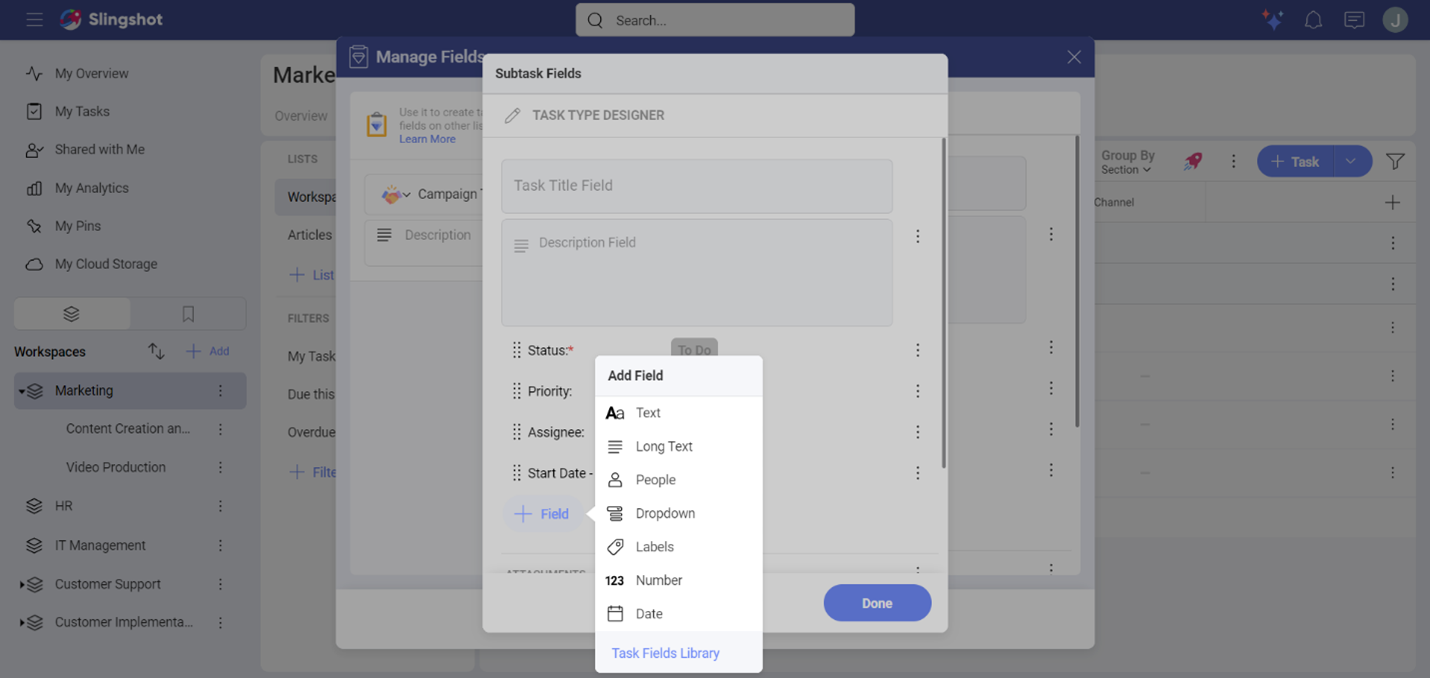
You will see the Subtask Fields dialog where you can add or remove fields. To add a field, click/tap on +Field.
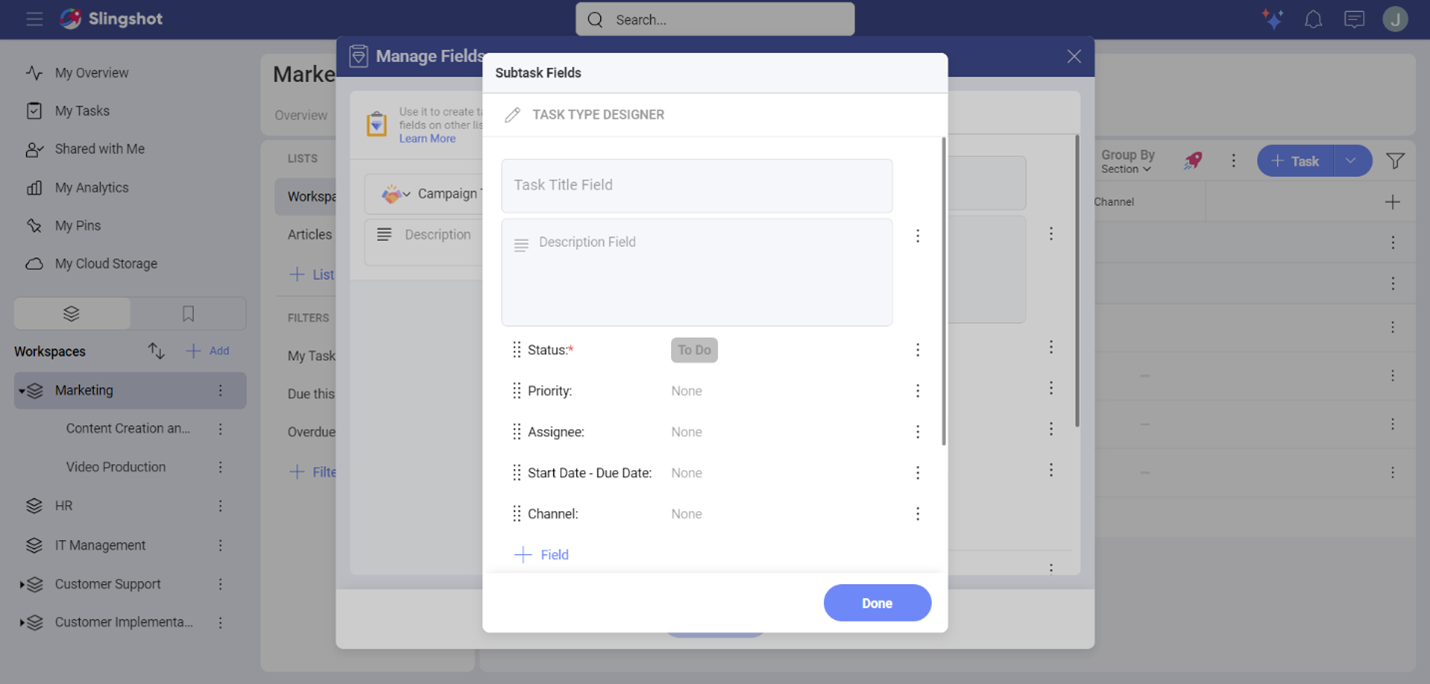
You will be presented with a list of different types of fields. Choose the one that best fits your business needs. In our case we added a label field named Channel.
- When you are ready, click/tap on Done and then on Update to save the changes.
If you have opened a parent task, you can add custom fields to a subtask without a task type when you:
Choose Manage Fields from the overflow menu of a parent task.
Scroll down to the Subtasks section and click/tap on Subtask Fields.
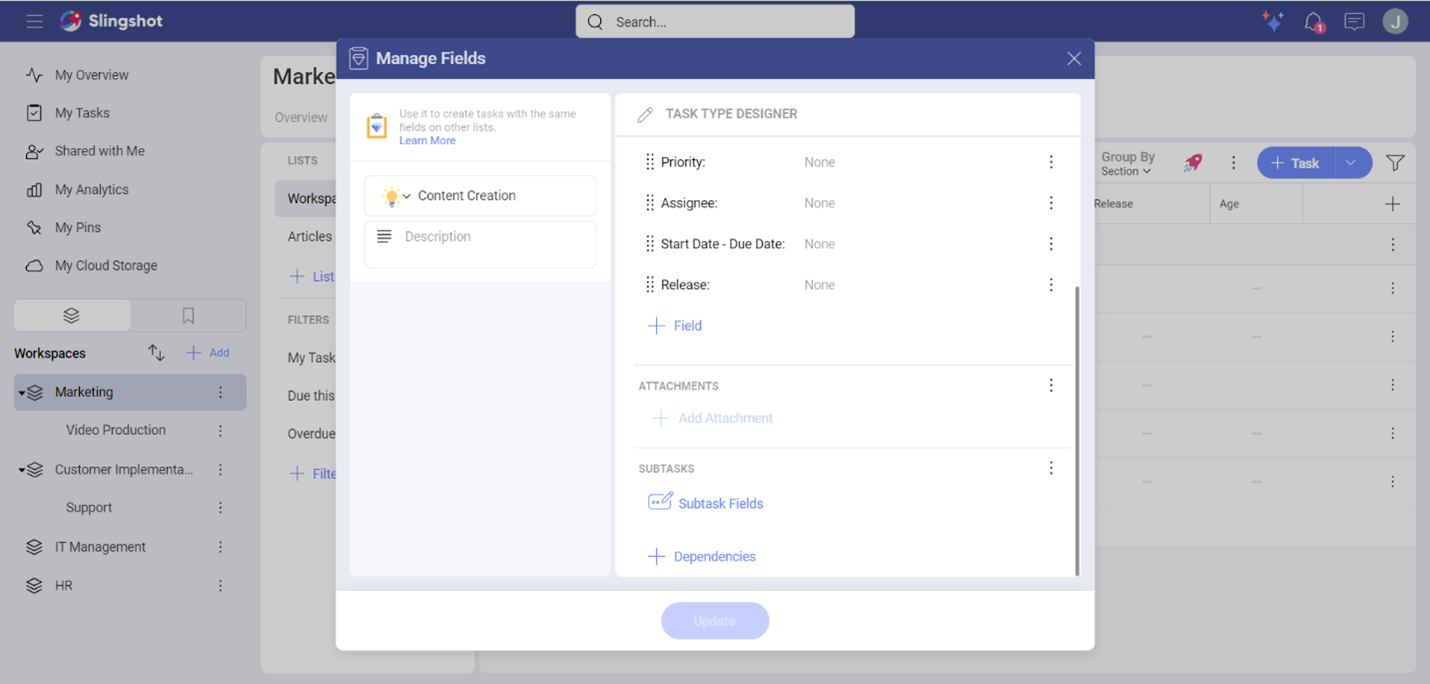
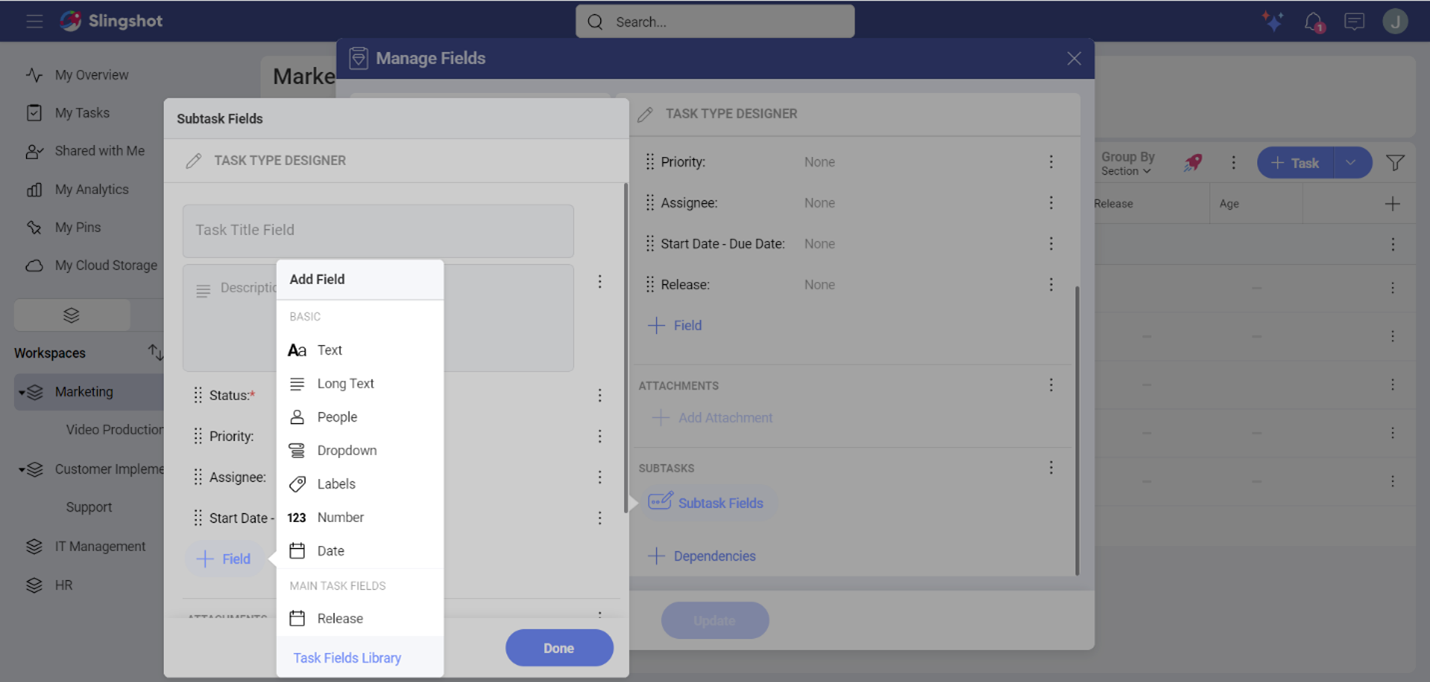
- Click/tap on +Field. The list of different types of fields will show up. Choose the one that fits best your goals. You can also use a field from the parent task. The available parent fields will appear under Main Task Fields.
- When you are ready, click/tap on Done and then Update to add the field.
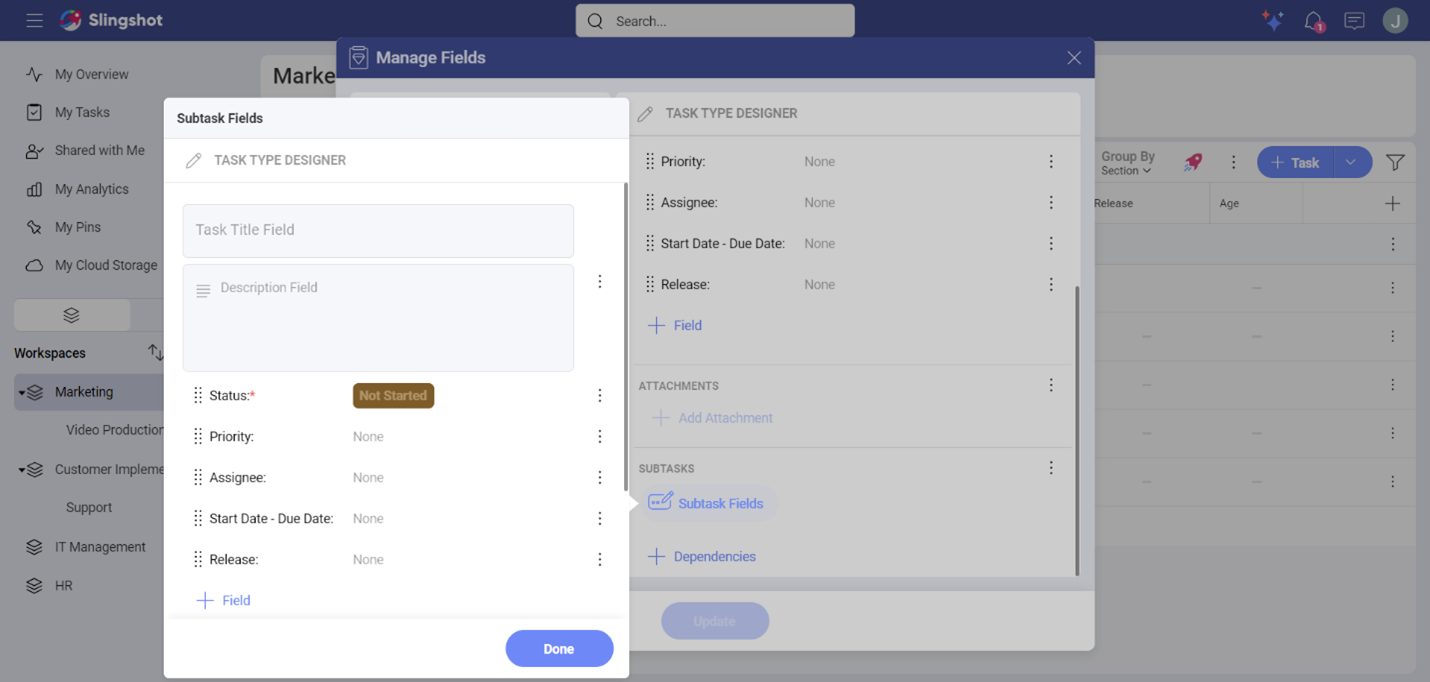
[!Note] If you add or remove fields from subtasks that have a specific task type, these changes will affect the type and its tasks.
When you have custom fields in a parent task, you can reuse them for its subtasks. This means that the values of each custom field will also be applied to the subtasks. All the fields from a parent task will appear under Main Task Fields.
For example, we had a parent task with a date field called Release. As we needed a way to keep track on the release dates for the subtasks, we wanted to use the Release field from the parent task. In order to do that we had to:
Open the overflow menu of a subtask.
Choose Manage Fields.
Click/tap on +Field to add a new field.
Choose the Release field that is under Main Task Fields.
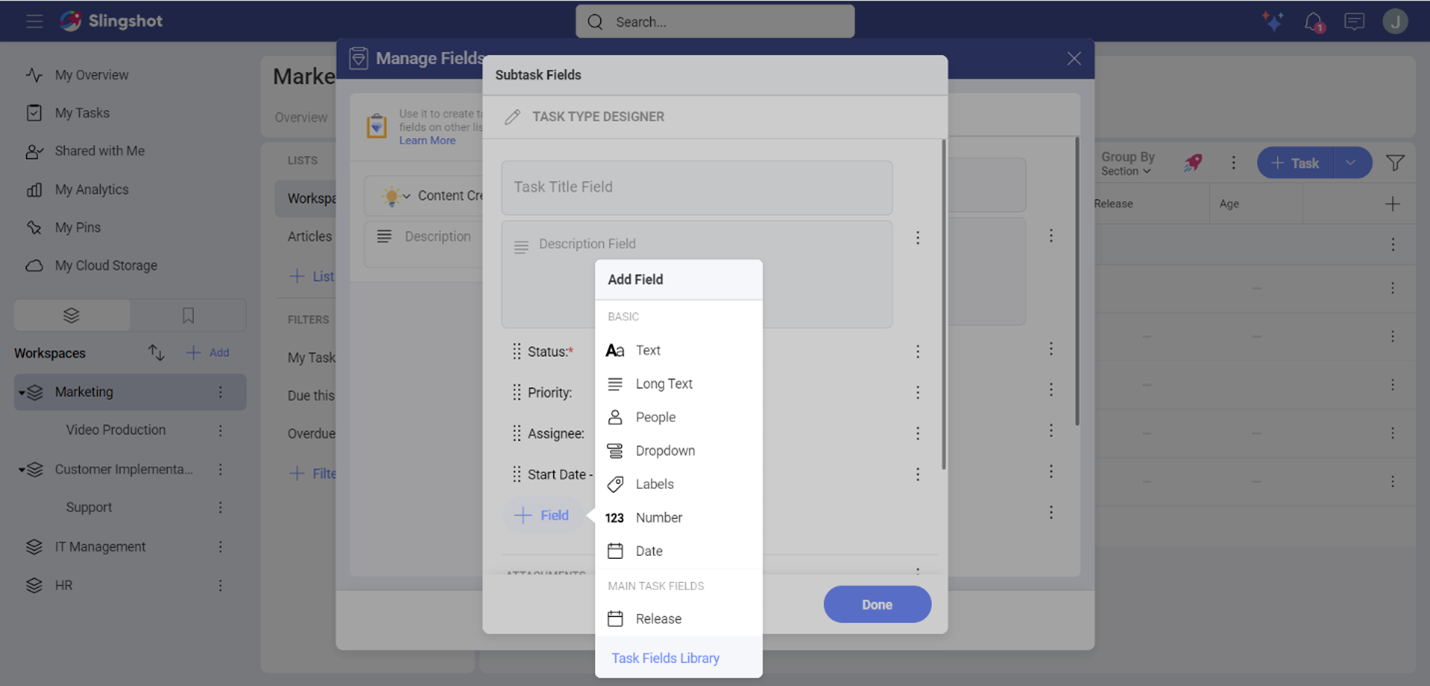
- Click/tap on Done and then Update.
[!Note] Subtasks and their parent task can have different values for the Status and the Priority field.
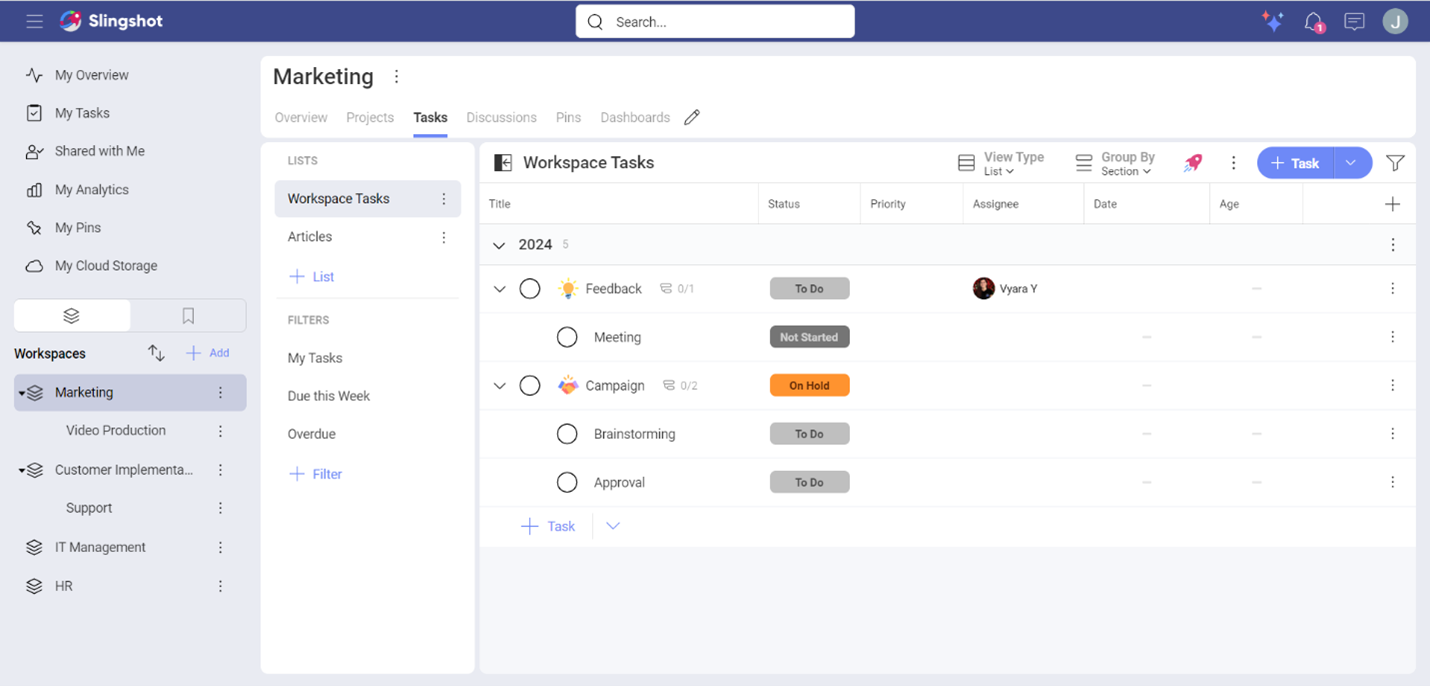
For example, instead of having a value named TO DO in the Status field, you can give the value another name, such as Not Started. You can also change the color of the value or hide other values that are not applicable to these specific subtasks.
To do that, you need to:
Open the overflow menu of a subtask.
Click/tap on Manage Fields.
Click/tap on the overflow menu of Status. Here you can:
Edit the field.
Use the field values from the parent task.
Pick a field from the Task Fields Library.
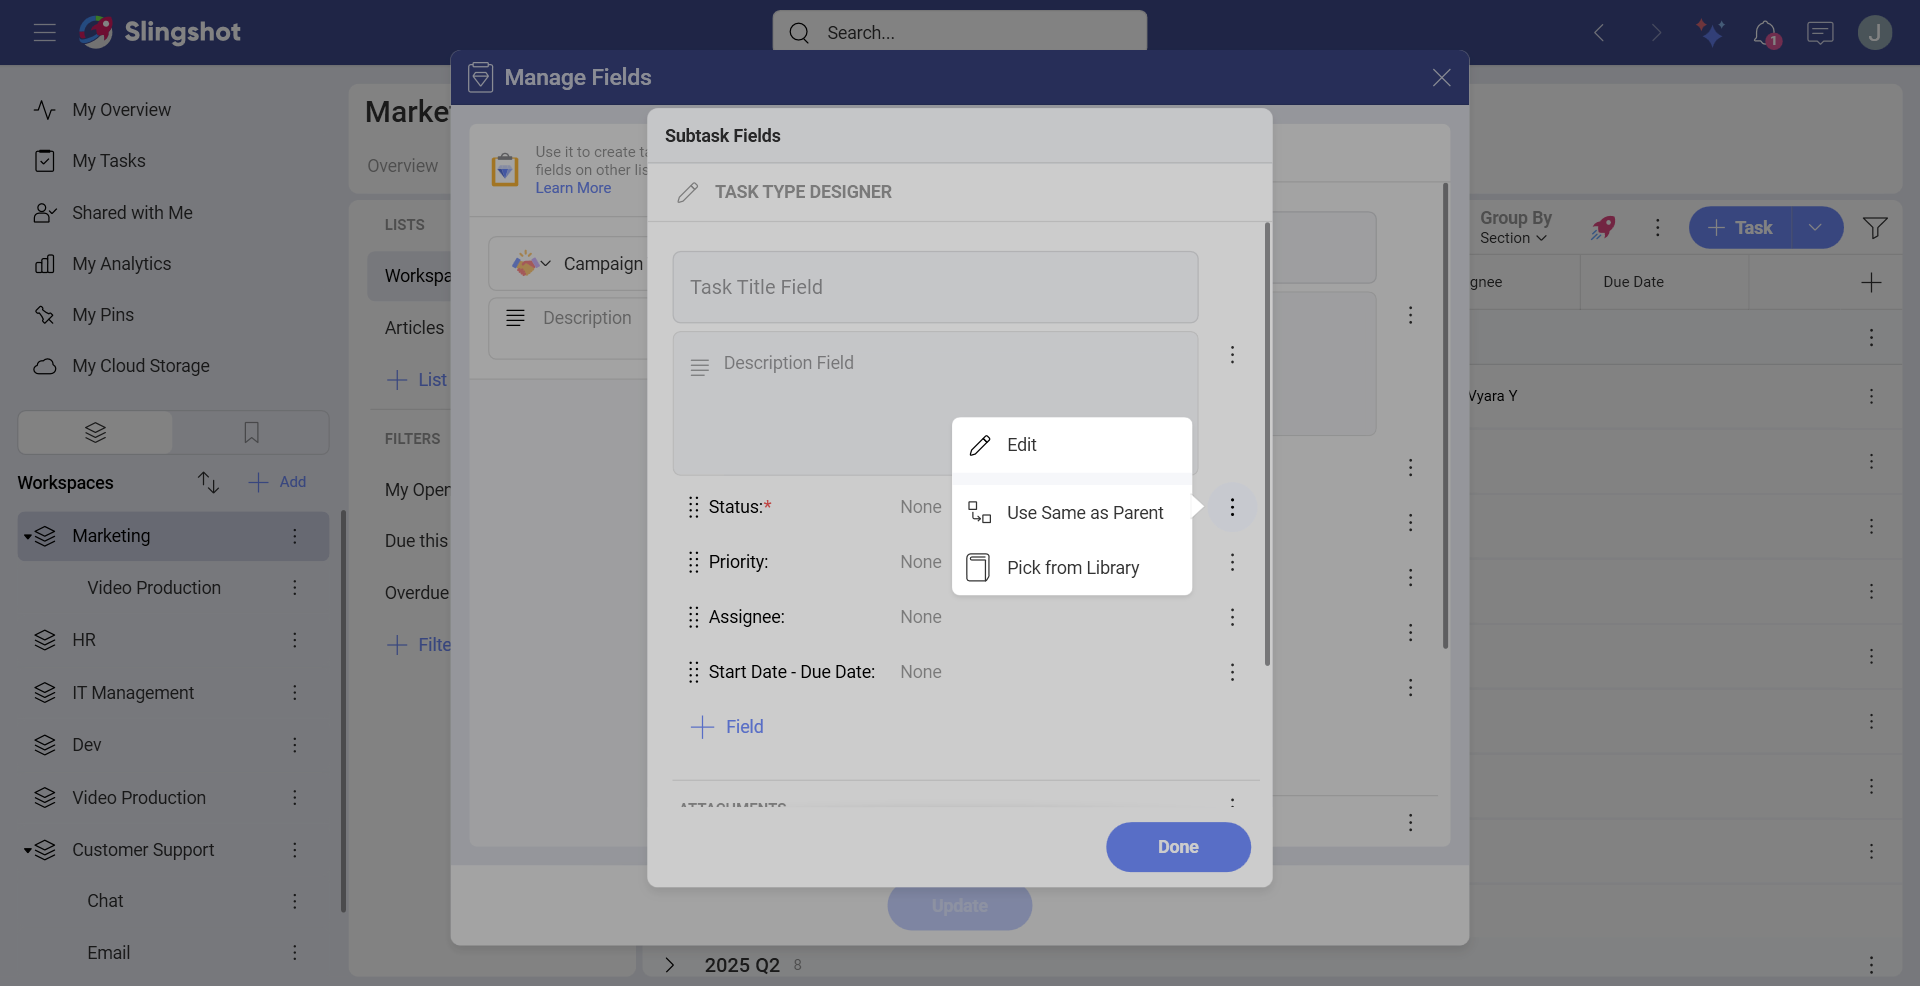
Choose Edit to change the values.
When you are ready, click/tap on Done and then Update.
You can see the updated Status of the task in the task list.
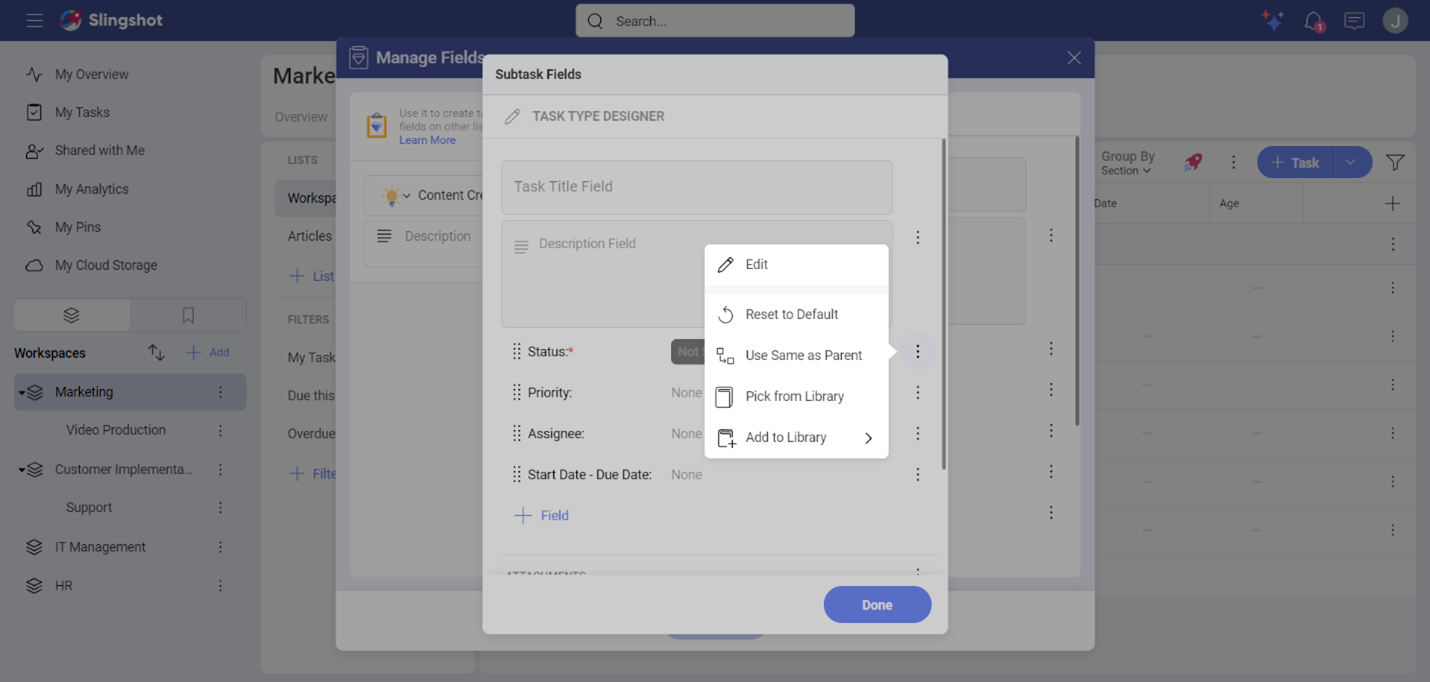
[!Note] Once your subtasks have a different value name from the parent task, you will also be presented with two more options: Reset to Default and Add to Library.
Task Fields Library
As mentioned above, each workspace, project or organization has its own Task Fields Library. Your own custom fields are saved in a personal library.
[!Note] If you are part of a project and its parent workspace, the custom fields will be saved in the Workspace Task Fields Library.
To open the Task Fields Library of a workspace, a project or an organization, you can:
Open the location settings.
Click/tap on Task Fields Library.
You will see a list of all the fields that are saved in that location.
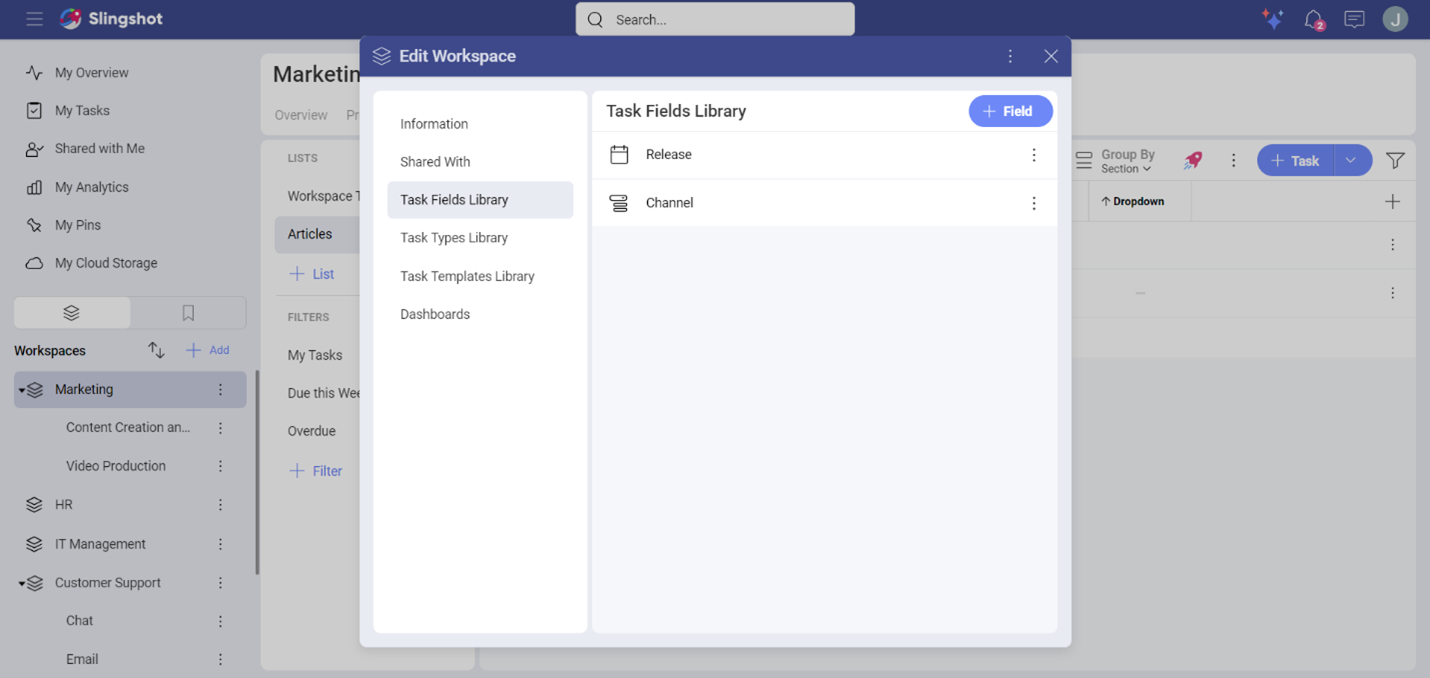
Based on your user permissions, you can make the following changes in a library:
Add a new field when you click/tap on the +Field button.
Edit an already existing field.
Delete a field.
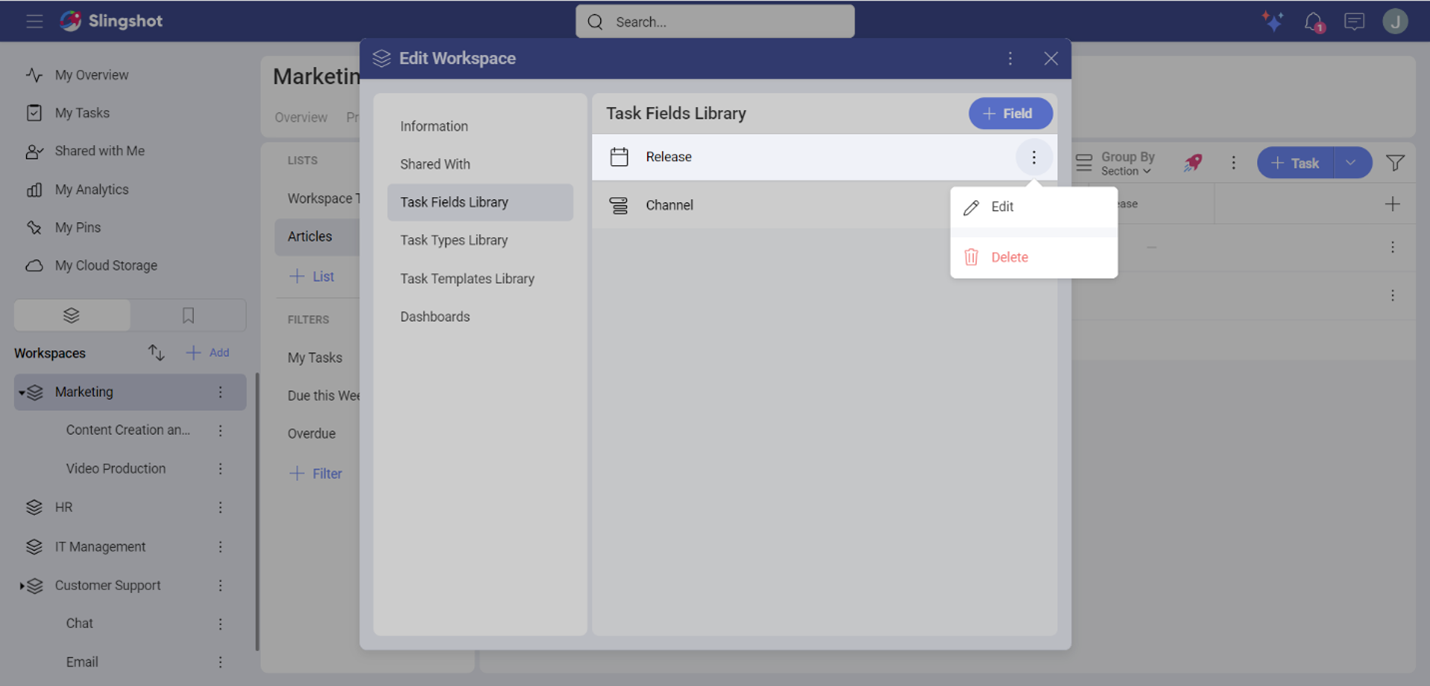
Any changes (edit or delete) on a field in a library, will affect the task types and the tasks that are currently using it.
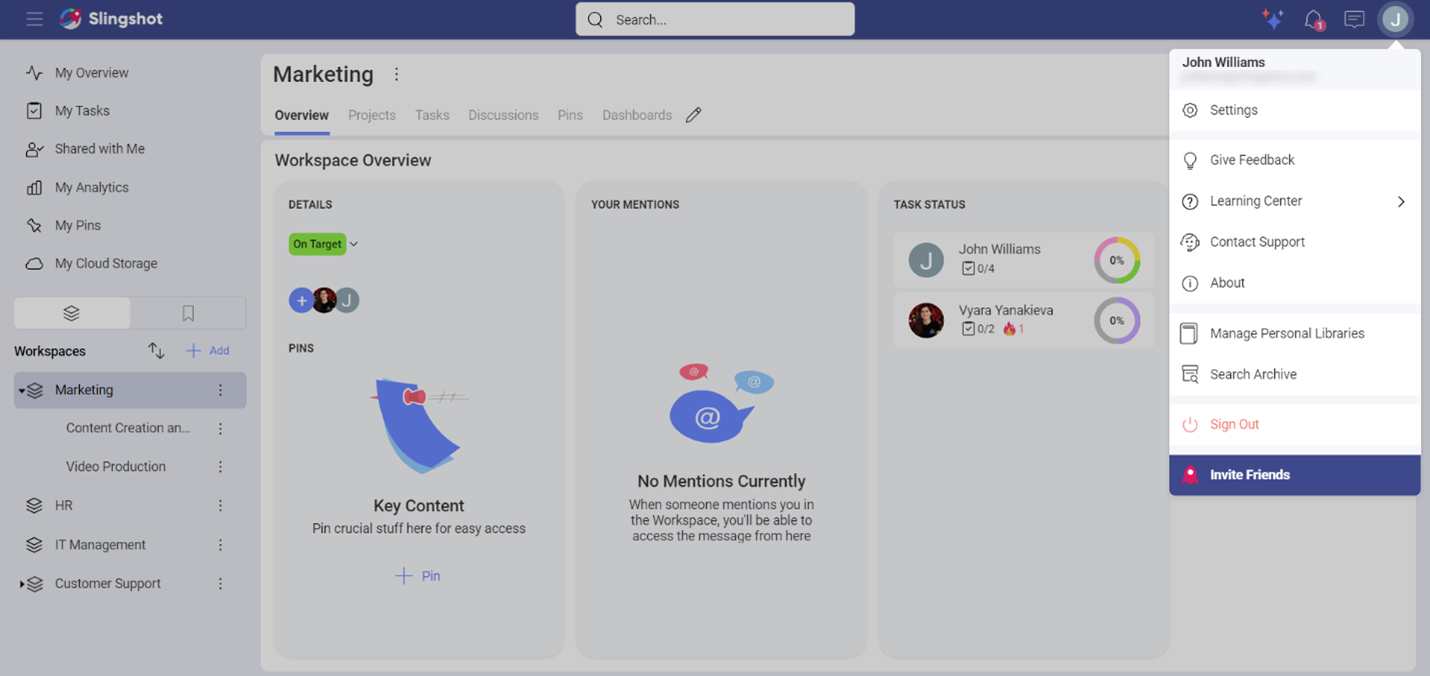
You can open your personal custom fields when you:
Go to the upper right corner and select your profile image.
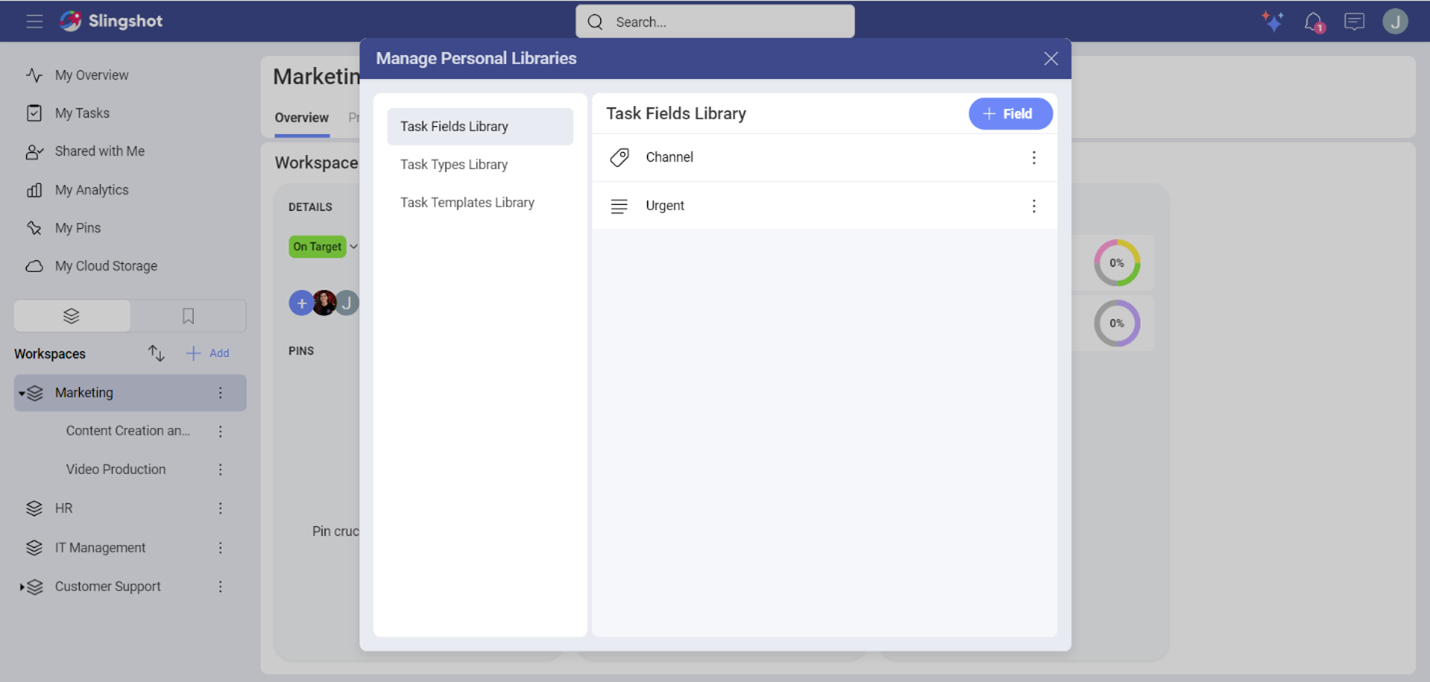
Choose Manage Personal Libraries.
- Here you will find all your personal task fields, task types and task templates.
Tips for using Custom Task Fields
As your list of custom fields constantly grows, we would recommend that you:
Avoid using the same title for different custom fields.
Be clear and descriptive while naming a field.
Be consistent with the style of naming custom fields.
Reuse existing fields to minimize redundancy (if applicable).
Periodically review and update custom fields in the Task Fields Library.
