Getting Started with Analytics SDK for ASP.NET
Step 1 - Create a New ASP.NET Web App
The steps below describe how to create a new ASP.NET Core Web App project. If you want to add the Analytics SDK to an existing application, go to Step 2.
1 - Start Visual Studio 2019 and click Create a new project on the start page, select the ASP.NET Core Web App template, and click Next.

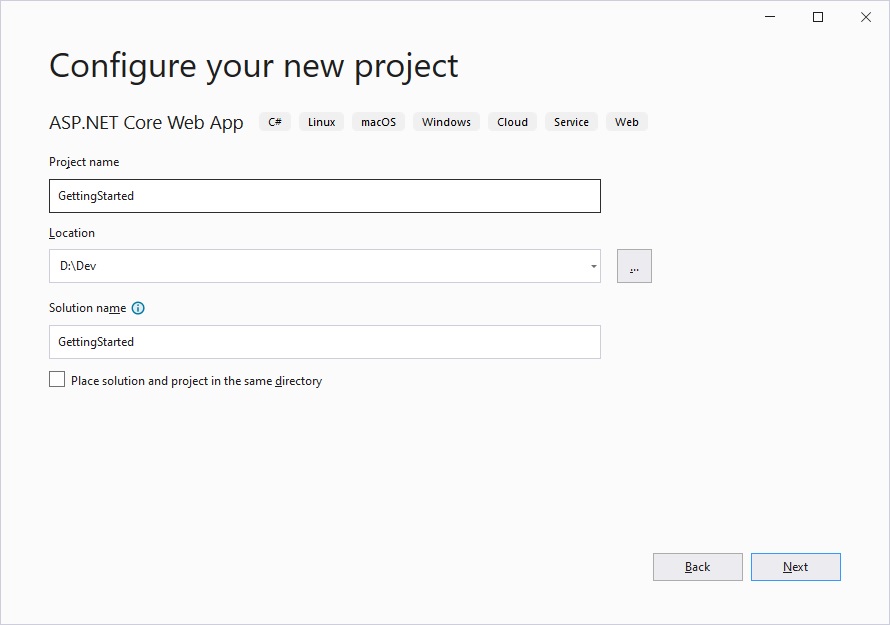
2 - Provide a project name and location, and click Next.
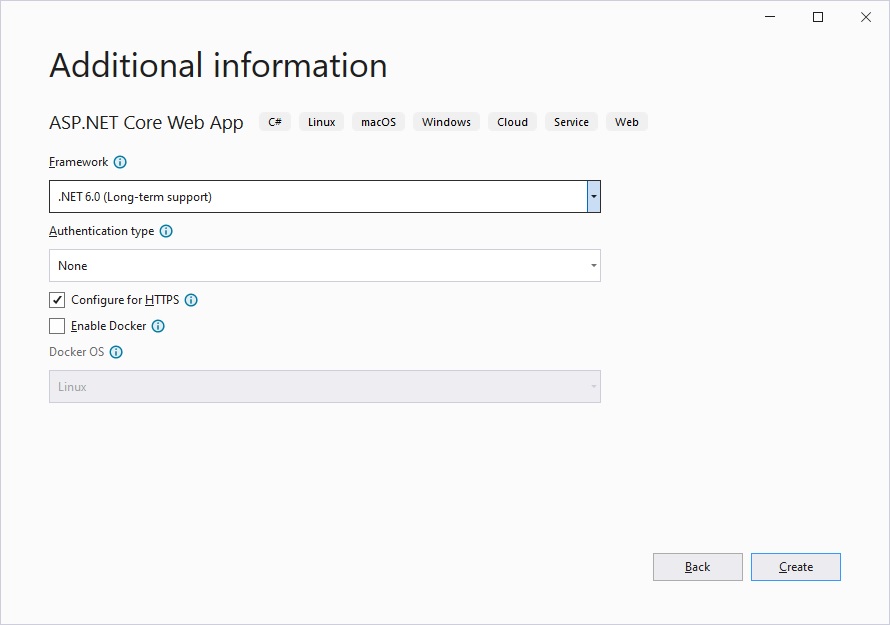
3 - Choose your framework, authentication type, and Docker options, and then click Create.
Step 2 - Add Analytics SDK
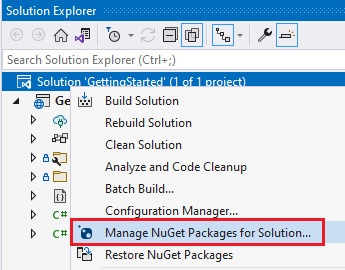
1 - Right click the Solution, or Project, and select Manage NuGet Packages for Solution.
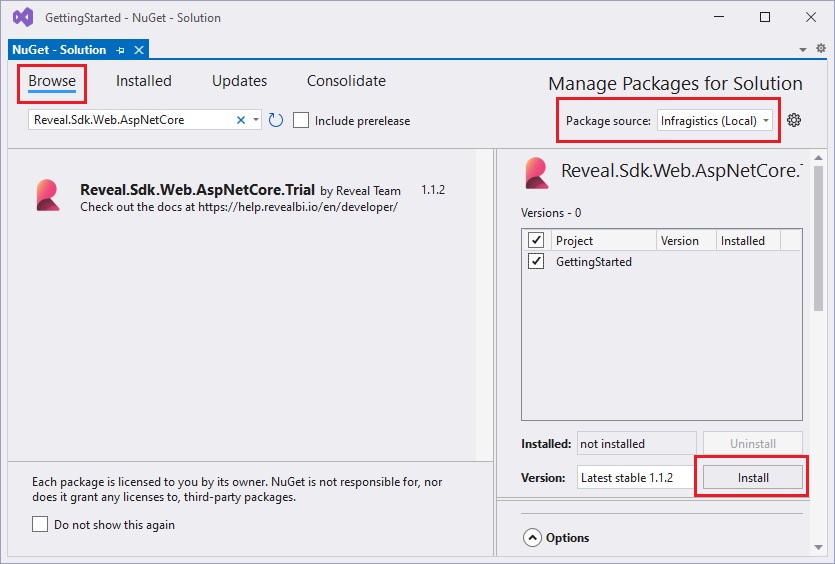
2 - In the package manager dialog, open the Browse tab, select the Infragistics (Local) package source, and install the Analytics.Sdk.Web.AspNetCore NuGet package into the project.
Note
If you are a trial user, you can install the Analytics.Sdk.Web.AspNetCore.Trial NuGet package found on NuGet.org.
3 - Open and modify the Program.cs file to add the namespace using Analytics.Sdk;. Then, add the call to IMcvBuilder.AddAnalytics() as follows:
using Analytics.Sdk;

builder.Services.AddRazorPages().AddAnalytics();
Step 3 - Add Analytics JavaScript API
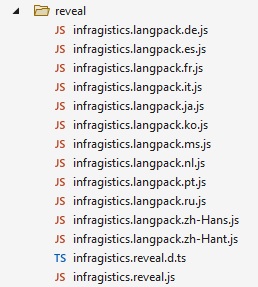
1 - Create a new folder called reveal under the wwwroot/lib folder.
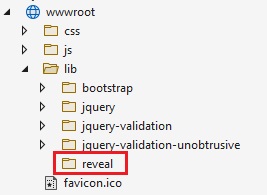
2 - Copy all the Javacript files located at %public%/Documents/Infragistics/Analytics/SDK/Web/JS/Client into the wwwroot/lib/reveal folder you created previously.
3 - Open and modify the Pages/Shared/_Layout.cshtml file to include the infragistics.reveal.js script at the bottom of the page just before the closing </body> tag, but after the jquery.min.js script.
<script src="~/lib/reveal/infragistics.reveal.js"></script>
Note
The Analytics JavaScript API depends on jQuery version 2.2 or greater.
4 - Install the remaining Analytics JavaScript API dependencies:
- Day.js 1.8.15 or greater
<script src="https://unpkg.com/dayjs@1.8.21/dayjs.min.js"></script>
- Quill RTE 1.3.6 or greater
<link href="https://cdn.quilljs.com/1.3.6/quill.snow.css" rel="stylesheet" type="text/css">
<script src="https://cdn.quilljs.com/1.3.6/quill.min.js"></script>
- Spectrum v 1.8.0 or newer (Optional) - this is only needed if you enable the UI for the end user to set the background color for a particular visualization.
<link href="https://cdnjs.cloudflare.com/ajax/libs/spectrum/1.8.0/spectrum.min.css" rel="stylesheet" type="text/css" >
<script src="https://cdnjs.cloudflare.com/ajax/libs/spectrum/1.8.0/spectrum.min.js"></script>
The final _Layout.cshtml files should look similar to this:
<!DOCTYPE html>
<html lang="en">
<head>
<meta charset="utf-8" />
<meta name="viewport" content="width=device-width, initial-scale=1.0" />
<title>@ViewData["Title"] - GettingStarted</title>
<link rel="stylesheet" href="~/lib/bootstrap/dist/css/bootstrap.min.css" />
<link rel="stylesheet" href="~/css/site.css" asp-append-version="true" />
<link rel="stylesheet" href="~/GettingStarted.styles.css" asp-append-version="true" />
<link href="https://cdn.quilljs.com/1.3.6/quill.snow.css" rel="stylesheet" type="text/css">
</head>
<body>
<header>
<nav class="navbar navbar-expand-sm navbar-toggleable-sm navbar-light bg-white border-bottom box-shadow mb-3">
<div class="container">
<a class="navbar-brand" asp-area="" asp-page="/Index">GettingStarted</a>
<button class="navbar-toggler" type="button" data-bs-toggle="collapse" data-bs-target=".navbar-collapse" aria-controls="navbarSupportedContent"
aria-expanded="false" aria-label="Toggle navigation">
<span class="navbar-toggler-icon"></span>
</button>
<div class="navbar-collapse collapse d-sm-inline-flex justify-content-between">
<ul class="navbar-nav flex-grow-1">
<li class="nav-item">
<a class="nav-link text-dark" asp-area="" asp-page="/Index">Home</a>
</li>
<li class="nav-item">
<a class="nav-link text-dark" asp-area="" asp-page="/Privacy">Privacy</a>
</li>
</ul>
</div>
</div>
</nav>
</header>
<div class="container">
<main role="main" class="pb-3">
@RenderBody()
</main>
</div>
<footer class="border-top footer text-muted">
<div class="container">
© 2022 - GettingStarted - <a asp-area="" asp-page="/Privacy">Privacy</a>
</div>
</footer>
<script src="~/lib/jquery/dist/jquery.min.js"></script>
<script src="~/lib/bootstrap/dist/js/bootstrap.bundle.min.js"></script>
<script src="~/js/site.js" asp-append-version="true"></script>
<script src="https://unpkg.com/dayjs@1.8.21/dayjs.min.js"></script>
<script src="https://cdn.quilljs.com/1.3.6/quill.min.js"></script>
<script src="~/lib/reveal/infragistics.reveal.js"></script>
@await RenderSectionAsync("Scripts", required: false)
</body>
</html>
Step 4 - Initialize the Analytics view
1 - Open and modify the Pages/Index.cshtml file and add a new <div> tag and set the id to revealView.
<div id="revealView" style="height: 800px; width: 100%;"></div>
2 - Add a Scripts section at the bottom of the Index.cshtml file and initialize the revealView.
@section Scripts
{
    <script type="text/javascript">
        $.ig.AnalyticsSdkSettings.ensureFontsLoadedAsync().then(() => {
            var revealView = new $.ig.AnalyticsView("#revealView");
        });
    </script>
}
This JavaScript code first calls the $.ig.AnalyticsSdkSettings.ensureFontsLoadedAsync to ensure that all fonts have been properly loaded. Next, we instaniate a new instance of the AnalyticsView by creating a new $.ig.AnalyticsView and passing in the #revealView selector.
The final Index.cshtml file should look like this:
@page
@model IndexModel
@{
    ViewData["Title"] = "Home page";
}

<div id="revealView" style="height: 800px; width: 100%;"></div>

@section Scripts
{
    <script type="text/javascript">
        $.ig.AnalyticsSdkSettings.ensureFontsLoadedAsync().then(() => {
            var revealView = new $.ig.AnalyticsView("#revealView");
        });
    </script>
}
Step 5 - Run the Application
Press F5 to run the application.
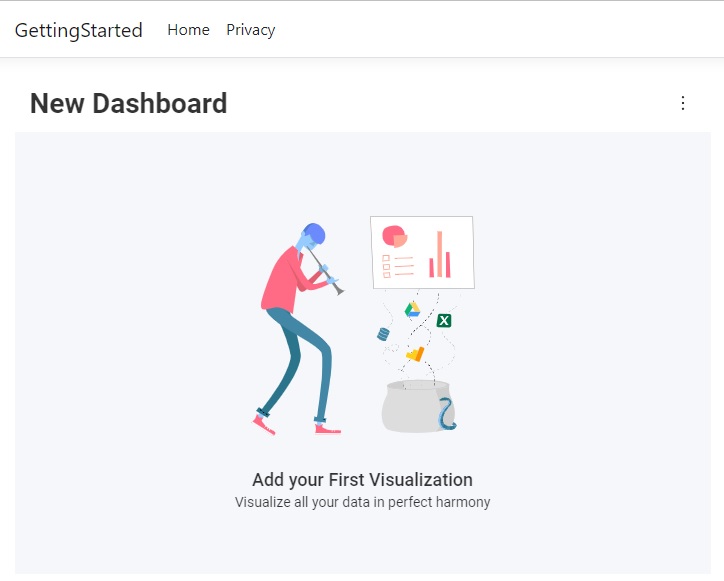
Congratulations! You have written your first Analytics SDK application.
Next Steps:
Note
The source code to this sample can be found on GitHub.